
- PlantUML을 이용하여 간단한 텍스트로 멋진 UML Diagram 만들기
- 문서 작성시 멋진 다이어그램을 쉽게 그리는 방법(Lucid Chart/Draw.io)
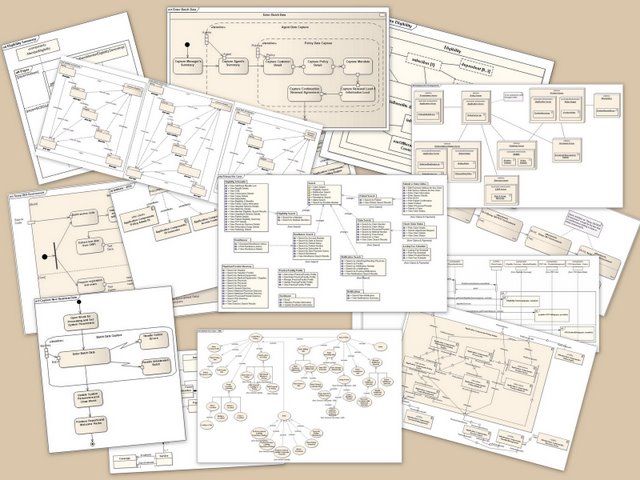
이번 장에서는 PlantUML을 이용하여 UML Diagram을 작성하는 방법에 대해 살펴보겠습니다. UML이란 Unified Modeling Language의 약자로서 통합 모델링 언어라고 합니다. UML은 아래 이미지와 같이 모델 간의 관계나 Process Flow 등을 시각적으로 표현하는 Diagram을 작성하는 데 사용합니다.
PlantUML은 간단한 텍스트를 이용하여 멋진 UML Diagram을 만들 수 있는 오픈소스 도구입니다. 텍스트로 작성되므로 Git과 같은 형상관리 툴 적용이 가능합니다. 소스 관리가 되므로 협업이 가능하며 언제든 변경 이력을 확인 하고 이전 내역으로도 복구가 가능합니다. 자세한 사용법은 아래 링크에서 확인할 수 있습니다.
PlantUML을 이용하면 아래와 같은 다양한 형태의 Diagram을 쉽게 작성할 수 있습니다.
PlantUML로 UML Diagram 작성하기
UML 언어로 문서를 작성하면 시각적인 Diagram 형태로 변환하여 출력할 수 있습니다. PlantUML 문서 작성을 도와주는 몇 가지 도구에 대해 알아보겠습니다.
PlantUML Online
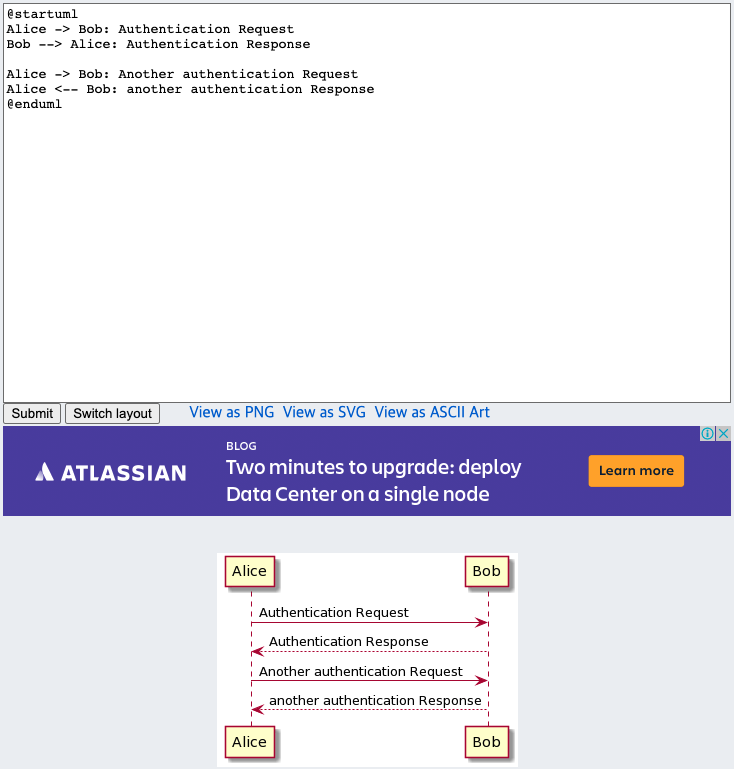
온라인에서 UML Diagram을 작성할 수 있는 PlantUML Web Server입니다. 추가적인 프로그램 설치 없이 UML을 작성하고 Diagram을 확인할 수 있는 가장 간단한 방법입니다. 작성된 UML Diagram은 마우스 오른쪽 메뉴를 호출하여 이미지로 다운로드 받을 수 있습니다.
http://www.plantuml.com/plantuml/uml/SyfFKj2rKt3CoKnELR1Io4ZDoSa70000
WordPress PlantUML Plugin
워드프레스에서 제공하는 PlantUML Plugin을 이용하면 문서 내에 UML Diagram을 Embed 할 수 있습니다. 다만 이 plugin의 경우 오래전에 만들어지고 업데이트가 되지 않아 최신 워드프레스에서 호환이 되지 않을 수 있습니다.
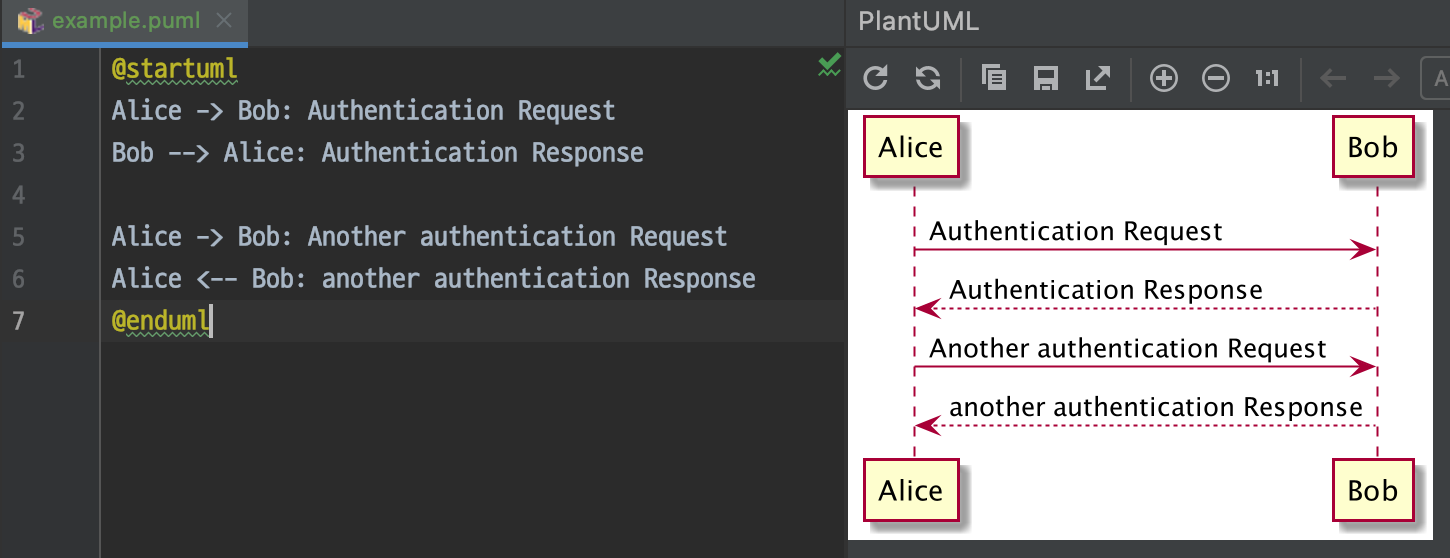
[plantuml]
Alice -> Bob: Authentication Request
Bob --> Alice: Authentication Response
Alice -> Bob: Another authentication Request
Alice <-- Bob: another authentication Response
[/plantuml]
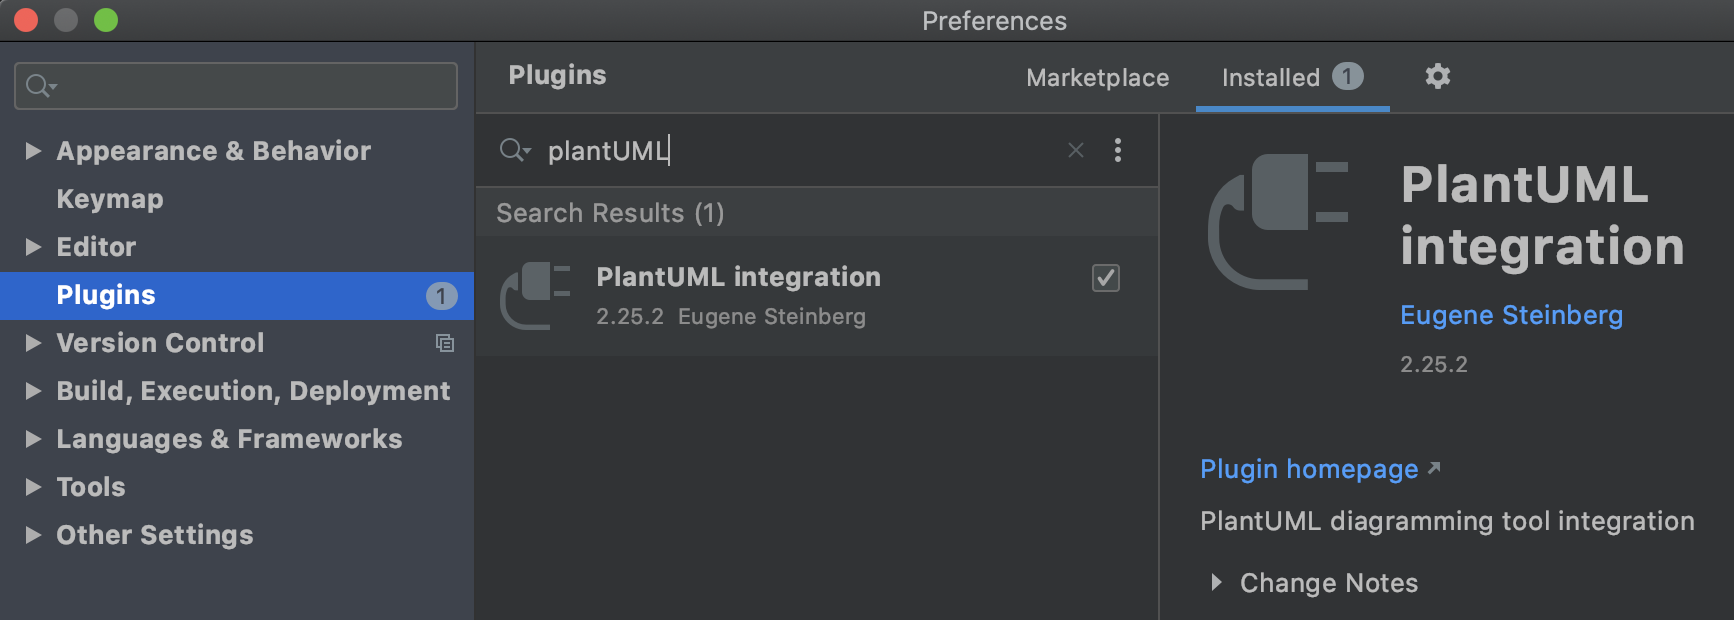
Intellij PlantUML Plugin
Intellij에 PlantUML Plugin을 설치하면 IDE에서 문서를 작성하고 바로 Diagram을 확인할 수 있습니다. 오프라인에서도 사용할 수 있다는 장점이 있으며 렌더링 속도도 빠릅니다. 만들어진 UML Diagram은 저장 버튼을 눌러 PNG 이미지로 다운로드할 수 있습니다. IDE에서 작성하기 때문에 GitHub와 연동이 수월합니다. GitHub를 연동해두면 코드가 자주 변경되더라도 변경사항을 추적할 수 있고 협업에도 유리한 장점이 있습니다. 개인적으로 추천하는 방식입니다.
UML은 직관적인 언어로 정의되어 있습니다. 몇 가지 다이어그램을 직접 작성해 보면서 어떻게 동작하는지 실습해 보겠습니다.
시퀀스 다이어그램
시퀀스 다이어그램은 가장 많이 사용되는 다이어그램으로 두 참여자 간에 주고받는 메시지 흐름을 그려야 할 때 유용합니다.
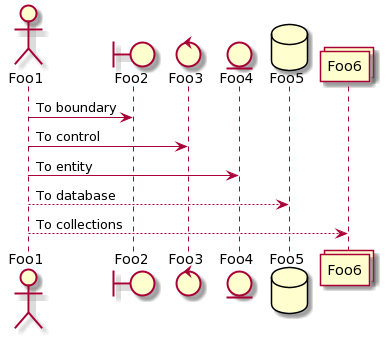
- 각각의 참여자는 선언하는 것만으로도 도형이 생성됩니다 ex) Foo1
- 참여자 간의 화살표는 ->과 –>을 사용하여 그릴 수 있습니다. ->은 실선, –>은 점선이 출력됩니다.
- 화살표 위에 설명을 붙이려면 : 뒤에 설명을 쓰면 됩니다.
- 참여자 선언 시 키워드(actor ~ collections)를 사용하면 화면에 출력되는 참여자의 모습을 변경할 수 있습니다.
@startuml
actor Foo1
boundary Foo2
control Foo3
entity Foo4
database Foo5
collections Foo6
Foo1 -> Foo2 : To boundary
Foo1 -> Foo3 : To control
Foo1 -> Foo4 : To entity
Foo1 --> Foo5 : To database
Foo1 --> Foo6 : To collections
@enduml
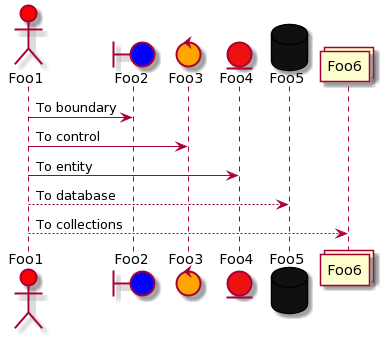
#배경색 : 참여자의 배경색 설정
참여자를 선언하고 ‘#색상’을 문서에 적용하면 참여자 배경색을 설정할 수 있습니다.
@startuml
actor Foo1 #red
boundary Foo2 #blue
control Foo3 #orange
entity Foo4 #EF1010
database Foo5 #101010
collections Foo6
Foo1 -> Foo2 : To boundary
Foo1 -> Foo3 : To control
Foo1 -> Foo4 : To entity
Foo1 --> Foo5 : To database
Foo1 --> Foo6 : To collections
@enduml
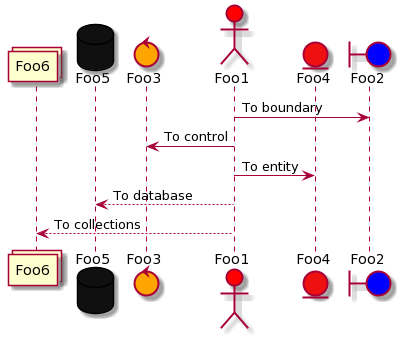
order 키워드 : 참여자의 출력 순서를 지정
참여자에 “order 순번”을 설정하면 숫자가 낮은 참여자부터 순서대로 출력됩니다.
@startuml
actor Foo1 order 10 #red
boundary Foo2 order 200 #blue
control Foo3 order 5 #orange
entity Foo4 order 100 #EF1010
database Foo5 order 2 #101010
collections Foo6 order 1
Foo1 -> Foo2 : To boundary
Foo1 -> Foo3 : To control
Foo1 -> Foo4 : To entity
Foo1 --> Foo5 : To database
Foo1 --> Foo6 : To collections
@enduml
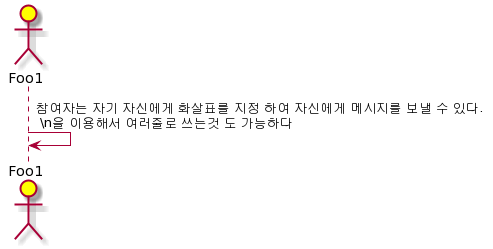
참여자 자신에게 메시지 보내기
양쪽 참여자를 동일하게 설정하고 화살표를 지정하면 되돌아오는 화살표로 화면에 표시됩니다.
@startuml
actor Foo1 order 10 #red
Foo1 -> Foo1 : 참여자는 자기 자신에게 화살표를 지정 하여 자신에게 메시지를 보낼 수 있다.\n \\n을 이용해서 여러줄로 쓰는것 도 가능하다.
@enduml
화살표 양쪽 끝 디자인 변경
@startuml
Foo ->x Bar
Foo -> Bar
Bob ->> Bar
Foo -\ Bar
Foo \\- Bar
Foo //-- Bar
Foo ->o Bar
Foo o\\-- Bar
Foo <-> Bar
Foo <->o Bar
@enduml
화살표 색상 변경
@startuml
Bob -[#green]> Alice : hello
Alice -[#red]->Bob : hello
@enduml
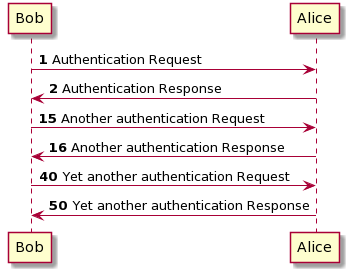
autonumber : 메시지 순서에 번호 매기기
autonumber [시작번호]의 형태로 표시하면 특정번호로 시작할 수 있으며 autonumber [시작번호] [증가값]으로 표시할 경우 증가값만큼 번호가 +되어 매겨집니다.
@startuml
autonumber
Bob -> Alice : Authentication Request
Bob <- Alice : Authentication Response
autonumber 15
Bob -> Alice : Another authentication Request
Bob <- Alice : Another authentication Response
autonumber 40 10
Bob -> Alice : Yet another authentication Request
Bob <- Alice : Yet another authentication Response
@enduml
페이지 제목, 머리말 꼬리말
title 키워드를 이용하여 페이지에 제목을 추가할 수 있습니다.
또한 header와 footer를 사용하여 머리말과 꼬리말도 표현할 수 있습니다.
@startuml
header 페이지헤더
footer Page %page% of %lastpage%
title 제목
Alice -> Bob : message 1
Alice -> Bob : message 2
@enduml

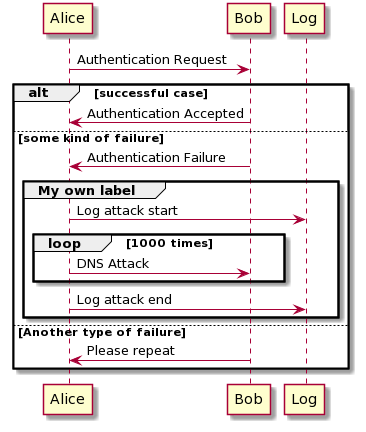
메시지 그룹화 하기
다음과 같은 키워드들을 사용하여 메시지를 그룹화할 수 있습니다.
- alt/else
- opt
- loop
- par
- break
- critical
- group
@startuml
Alice -> Bob: Authentication Request
alt successful case
Bob -> Alice: Authentication Accepted
else some kind of failure
Bob -> Alice: Authentication Failure
group My own label
Alice -> Log : Log attack start
loop 1000 times
Alice -> Bob: DNS Attack
end
Alice -> Log : Log attack end
end
else Another type of failure
Bob -> Alice: Please repeat
end
@enduml
메시지에 노트 추가하기
메시지 다음에 note left 나 note right 키워드를 이용하여, 메시지에 노트를 추가할 수 있습니다. 한 번에 여러 줄의 노트를 추가하는 경우에는 end note 를 이용하여, 노트의 끝을 표시해 주어야 합니다. note left of , note right of, note over 키워드를 이용하여 참여자의 상대적인 위치에 노트를 추가할 수 도 있습니다. 노트의 배경색을 변경 함으로써 노트를 강조하는 것도 가능합니다.
@startuml
participant Alice
participant Bob
note left of Alice #aqua
This is displayed
left of Alice.
end note
note right of Alice: This is displayed right of Alice.
note over Alice: This is displayed over Alice.
note over Alice, Bob #FFAAAA: This is displayed\n over Bob and Alice.
note over Bob, Alice
This is yet another
example of
a long note.
end note
@enduml

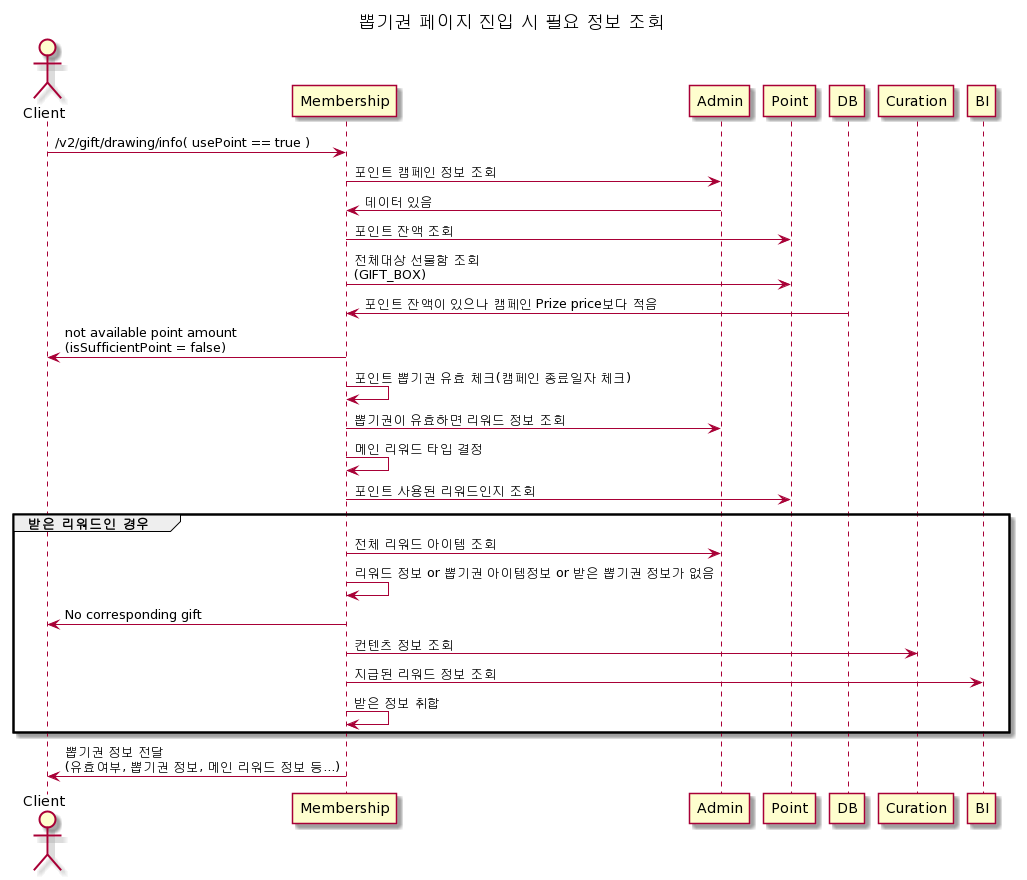
시퀀스 다이어그램으로 비즈니스 로직 Flow Diagram 작성 예제
@startuml
title 뽑기권 페이지 진입 시 필요 정보 조회 - 포인트로 뽑기권 돌릴때\n(giftboxService.getDrawingInfoUsingPointV2)
actor Client
Client -> Membership: /v2/gift/drawing/info( usePoint == true )
Membership -> Admin : 포인트 캠페인 정보 조회
Membership <- Admin : 데이터 있음
Membership -> Point : 포인트 잔액 조회
Membership -> Point : 전체대상 선물함 조회\n(GIFT_BOX)
Membership <- DB : 포인트 잔액이 있으나 캠페인 Prize price보다 적음
Membership -> Client : not available point amount\n(isSufficientPoint = false)
Membership -> Membership : 포인트 뽑기권 유효 체크(캠페인 종료일자 체크)
Membership -> Admin : 뽑기권이 유효하면 리워드 정보 조회
Membership -> Membership : 메인 리워드 타입 결정
Membership -> Point : 포인트 사용된 리워드인지 조회
group 받은 리워드인 경우
Membership -> Admin : 전체 리워드 아이템 조회
Membership -> Membership: 리워드 정보 or 뽑기권 아이템정보 or 받은 뽑기권 정보가 없음
Membership -> Client: No corresponding gift
Membership -> Curation: 컨텐츠 정보 조회
Membership -> BI: 지급된 리워드 정보 조회
Membership -> Membership: 받은 정보 취합
end group
Membership -> Client : 뽑기권 정보 전달\n(유효여부, 뽑기권 정보, 메인 리워드 정보 등...)
@enduml
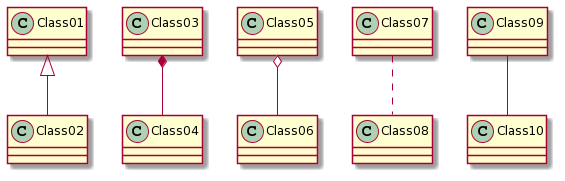
클래스 다이어그램
클래스 다이어그램은 클래스 간에 관계를 표현하는 다이어그램을 그리는데 유용합니다. 아래와 같이 클래스 간의 관계를 표현하기 위한 다양한 방법을 제공합니다.
@startuml
Class01 <|-- Class02
Class03 *-- Class04
Class05 o-- Class06
Class07 .. Class08
Class09 -- Class10
@enduml
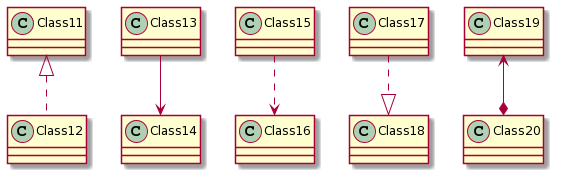
@startuml
Class11 <|.. Class12
Class13 --> Class14
Class15 ..> Class16
Class17 ..|> Class18
Class19 <--* Class20
@enduml
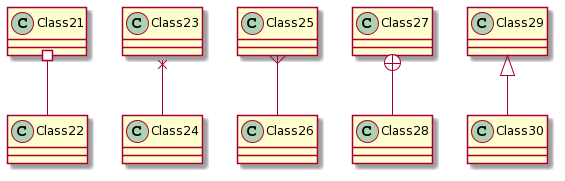
@startuml
Class21 #-- Class22
Class23 x-- Class24
Class25 }-- Class26
Class27 +-- Class28
Class29 ^-- Class30
@enduml
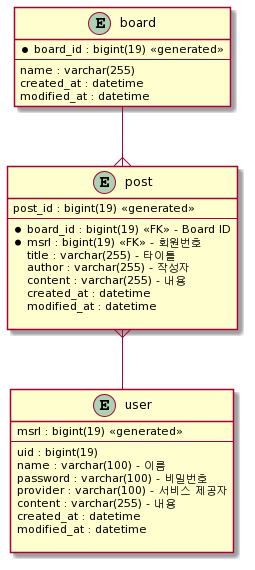
클래스 다이어그램을 이용한 Table간 관계 Diagram 작성 예제
@startuml
entity "board" as board {
    *board_id : bigint(19) <<generated>>
    --
    name : varchar(255)
    created_at : datetime
    modified_at : datetime
}

entity "post" as post {
   post_id : bigint(19) <<generated>>
   --
   * board_id : bigint(19) <<FK>> - Board ID
   * msrl : bigint(19) <<FK>> - 회원번호
   title : varchar(255) - 타이틀
   author : varchar(255) - 작성자
   content : varchar(255) - 내용
   created_at : datetime
   modified_at : datetime

}

entity "user" as user {
   msrl : bigint(19) <<generated>>
   --
   uid : bigint(19)
   name : varchar(100) - 이름
   password : varchar(100) - 비밀번호
   provider : varchar(100) - 서비스 제공자
   content : varchar(255) - 내용
   created_at : datetime
   modified_at : datetime

}

board --{ post
post }-- user
@enduml
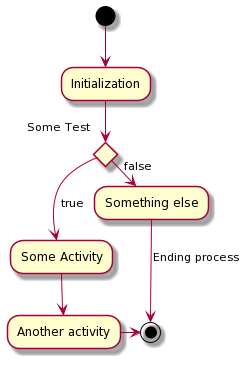
액티비티 다이어그램
어떠한 일을 처리하는 과정을 순서대로 도식화하는 flowchart를 손쉽게 그릴 수 있도록 도와주는 다이어그램입니다.
@startuml
(*) --> "Initialization"
if "Some Test" then
-->[true] "Some Activity"
--> "Another activity"
-right-> (*)
else
->[false] "Something else"
-->[Ending process] (*)
endif
@enduml
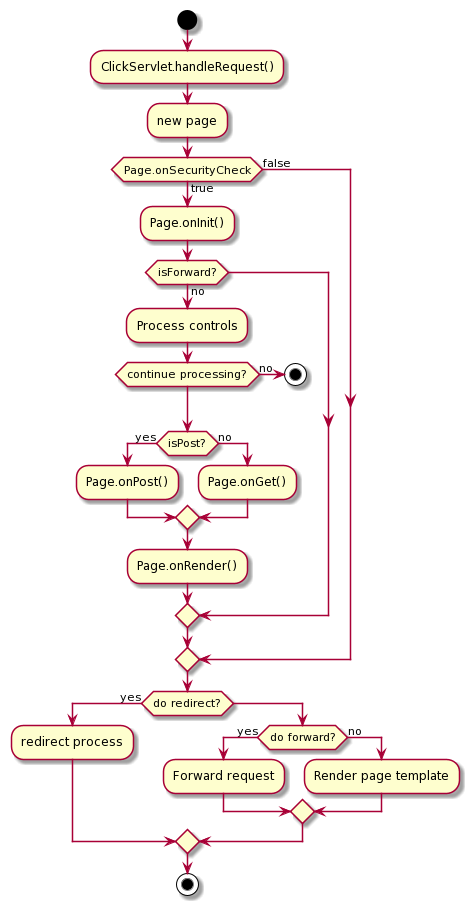
복잡한 형태의 flow chart 작성 예제
@startuml
start
:ClickServlet.handleRequest();
:new page;
if (Page.onSecurityCheck) then (true)
:Page.onInit();
if (isForward?) then (no)
:Process controls;
if (continue processing?) then (no)
stop
endif
if (isPost?) then (yes)
:Page.onPost();
else (no)
:Page.onGet();
endif
:Page.onRender();
endif
else (false)
endif
if (do redirect?) then (yes)
PlantUML 언어참조가이드 (1.2019.9) 73 / 171
5.15 Complete example 5 ACTIVITY DIAGRAM (BETA)
:redirect process;
else
if (do forward?) then (yes)
:Forward request;
else (no)
:Render page template;
endif
endif
stop
@enduml
여기까지 plantUML을 사용하여 UML Diagram을 그리는 방법에 대해 알아보았습니다. plantUML을 이용하면 작성자의 응용에 따라 무궁무진한 내용을 시각적으로 표현 가능합니다.
포스팅에서는 대표적으로 사용하는 다이어그램에 대해서만 간단히 알아봤지만 다음 레퍼런스 가이드를 참고하면 보다 복잡하고 어려운 로직의 Diagram도 작성할 수 있을 것입니다.
http://www.daddyprogrammer.org/wp-content/uploads/2020/06/PlantUML_Language_Reference_Guide_ko.pdf

 사용해보기")


