이번 장에서는 Spring Oauth2를 이용한 ResourceServer(api서버) 구축을 실습해보겠습니다. 이전 장에서 만든 AuthorizationServer와 연동하여 실습은 진행됩니다. 실습은 bearer 토큰 방식부터 진행합니다.
최신 소스는 아래 GitHub 주소를 참고해 주세요.
https://github.com/codej99/SpringOauth2ResourceServer.git
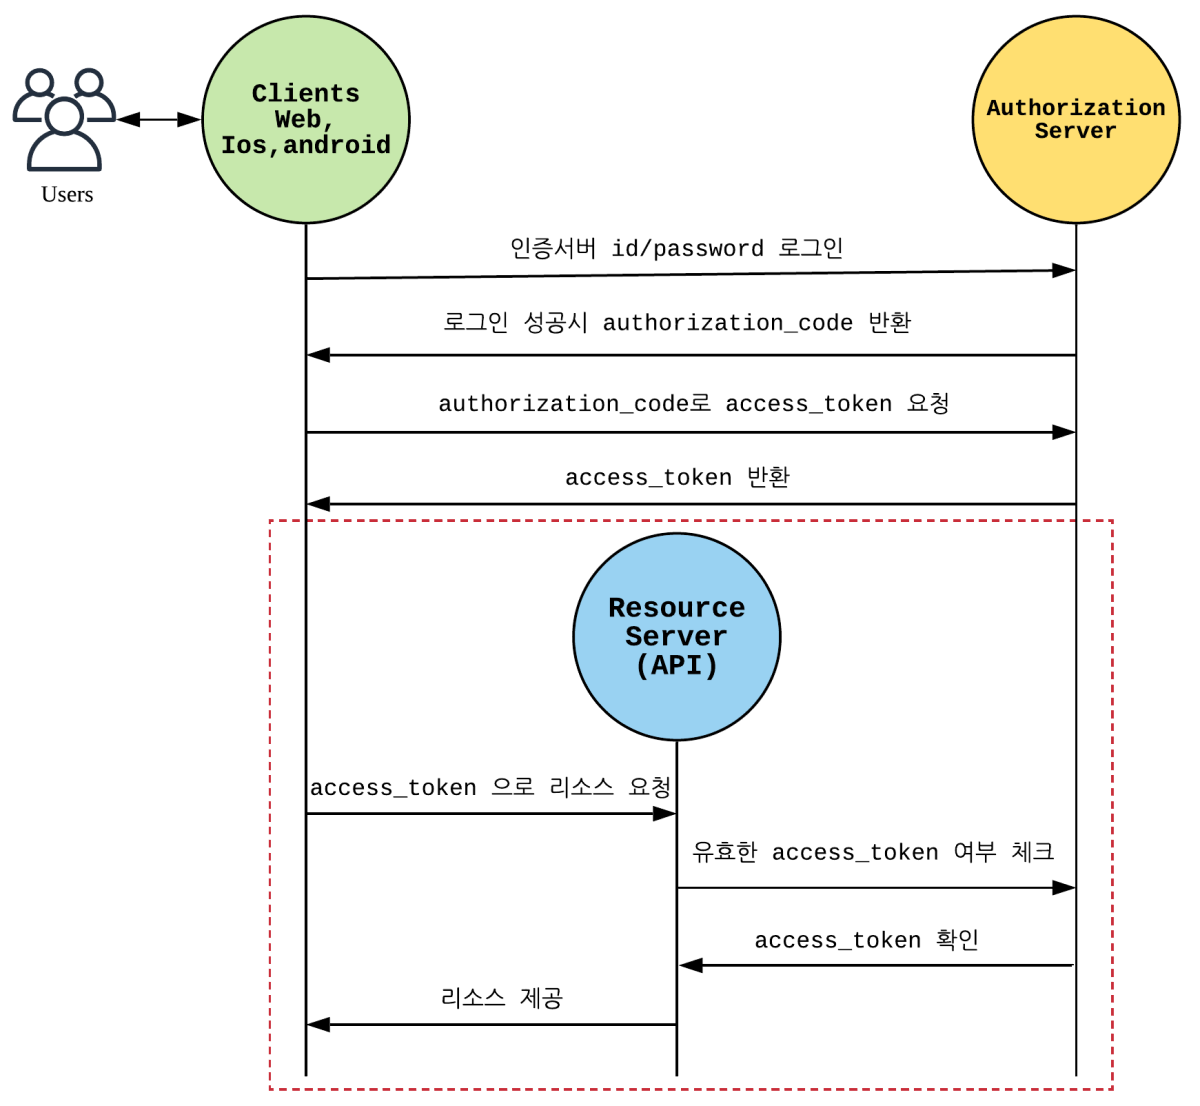
bearer token Flow
아래 내용 중 테두리를 친 부분이 리소스 서버에서 개발해야 할 사항입니다.
Authorization Server 수정
이전 시간에 만들었던 AuthorizationSever 내용을 수정합니다. Oauth2AuthorizationConfig에서 bearer token방식으로 테스트 하기 위해 다음과 같이 변경합니다. bearer토큰은 활성화 시키고 jwtToken 설정 부분은 주석 처리합니다.
/**
* 토큰 정보를 DB를 통해 관리한다.
*
* @return
*/
@Override
public void configure(AuthorizationServerEndpointsConfigurer endpoints) {
    endpoints.tokenStore(new JdbcTokenStore(dataSource)).userDetailsService(userDetailService);
}

/**
* 토큰 발급 방식을 JWT 토큰 방식으로 변경한다. 이렇게 하면 토큰 저장하는 DB Table은 필요가 없다.
*
* @param endpoints
* @throws Exception
*/
//    @Override
//    public void configure(AuthorizationServerEndpointsConfigurer endpoints) throws Exception {
//        super.configure(endpoints);
//        endpoints.accessTokenConverter(jwtAccessTokenConverter()).userDetailsService(userDetailService);
//    }

/**
* jwt converter를 등록
*
* @return
*/
//    @Bean
//    public JwtAccessTokenConverter jwtAccessTokenConverter() {
//        JwtAccessTokenConverter converter = new JwtAccessTokenConverter();
//        converter.setSigningKey(signKey);
//        return converter;
//    }
/oauth/check_token 활성화
Resource서버에서 token 검증 요청을 Authorization서버로 보낼때 /oauth/check_token을 호출하는데, 해당 요청을 받기 위해 Oauth2AuthorizationConfig에 아래 설정을 추가합니다.
@Override
public void configure(AuthorizationServerSecurityConfigurer security) throws Exception {
    security.tokenKeyAccess("permitAll()")
            .checkTokenAccess("isAuthenticated()") //allow check token
            .allowFormAuthenticationForClients();
}
ResourceServer 구현
새로운 프로젝트를 하나 생성합니다.
>> Intellij Community 프로젝트생성
신규 프로젝트를 초기 구성하는데 어려움이 있다면 Spring initializr를 통해 간편하게 프로젝트를 생성할 수 있습니다. 다음 포스팅을 참고해 주세요.
>> Spring initializr로 Spring 프로젝트 생성하기
build.gradle 수정
AuthorizationServer와 내용은 동일합니다.
plugins {
    id 'org.springframework.boot' version '2.1.4.RELEASE'
    id 'java'
}

apply plugin: 'io.spring.dependency-management'

group = 'com.rest'
version = '0.0.1-SNAPSHOT'
sourceCompatibility = '1.8'

configurations {
    compileOnly {
        extendsFrom annotationProcessor
    }
}

repositories {
    mavenCentral()
}

dependencies {
    implementation 'org.springframework.boot:spring-boot-starter-data-jpa'
    implementation 'org.springframework.boot:spring-boot-starter-web'
    implementation 'org.springframework.cloud:spring-cloud-starter-security:2.1.2.RELEASE'
    implementation 'org.springframework.cloud:spring-cloud-starter-oauth2:2.1.2.RELEASE'
    compileOnly 'org.projectlombok:lombok'
    runtimeOnly 'com.h2database:h2'
    annotationProcessor 'org.projectlombok:lombok'
    testImplementation 'org.springframework.boot:spring-boot-starter-test'
}
application.yml 수정
테스트시 인증서버와 리소스 서버를 동시에 띄워야 하므로 port는 8080으로 합니다. 아래 내용에서 주목해서 볼 부분은 하단의 security관련 설정입니다.
리소스 서버는 인증서버에 토큰 체크를 요청해야 하므로 요청시 필요한 데이터인client-id, client-secret, 토큰 체크 uri을 설정해 놓습니다.
server:
  port: 8080

spring:
  h2:
    console:
      enabled: true
      settings:
        web-allow-others: true
  datasource:
    url: jdbc:h2:tcp://localhost/~/test
    driver-class-name: org.h2.Driver
    username: sa
  jpa:
    database-platform: org.hibernate.dialect.H2Dialect
    properties.hibernate.hbm2ddl.auto: update
    showSql: true

security:
  oauth2:
    client:
      client-id: testClientId
      client-secret: testSecret
    resource:
      token-info-uri: http://localhost:8081/oauth/check_token
리소스 서버 Config 생성
@EnableResourceServer를 선언하여 리소스 서버임을 세팅합니다. Spring security 설정시 H2 console접근이 차단되므로 해당 내용을 disable하기 위해 아래 내용을 추가합니다.
http.headers().frameOptions().disable()
users api는 read scope로 접근할 수 있는 리소스로 설정합니다.
package com.rest.oauth2.config;

import org.springframework.context.annotation.Configuration;
import org.springframework.security.config.annotation.web.builders.HttpSecurity;
import org.springframework.security.oauth2.config.annotation.web.configuration.EnableResourceServer;
import org.springframework.security.oauth2.config.annotation.web.configuration.ResourceServerConfigurerAdapter;

@Configuration
@EnableResourceServer
public class Oauth2ResourceServerConfig extends ResourceServerConfigurerAdapter {

    @Override
    public void configure(HttpSecurity http) throws Exception {
        http.headers().frameOptions().disable();
        http.authorizeRequests()
                .antMatchers("/v1/users").access("#oauth2.hasScope('read')")
                .anyRequest().authenticated();
    }
}
리소스 요청을 처리하는 Controller 작성
회원 리스트를 결과로 주는 UserController를 하나 생성합니다.
package com.rest.oauth2.controller;

import com.rest.oauth2.entity.User;
import com.rest.oauth2.repo.UserJpaRepo;
import lombok.RequiredArgsConstructor;
import org.springframework.web.bind.annotation.GetMapping;
import org.springframework.web.bind.annotation.RequestMapping;
import org.springframework.web.bind.annotation.RestController;

import java.util.List;

@RequiredArgsConstructor
@RestController
@RequestMapping(value = "/v1")
public class UserController {

    private final UserJpaRepo userJpaRepo;

    @GetMapping(value = "/users")
    public List<User> findAllUser() {
        return userJpaRepo.findAll();
    }
}
UserJpaRepo 생성
회원 정보를 조회할 JPA Repository를 선언합니다.
package com.rest.oauth2.repo;

import com.rest.oauth2.entity.User;
import org.springframework.data.jpa.repository.JpaRepository;

import java.util.Optional;

public interface UserJpaRepo extends JpaRepository<User, Long> {
}
User entity 생성
회원 정보를 관리할 entity를 생성합니다.
package com.rest.oauth2.entity;

import com.fasterxml.jackson.annotation.JsonProperty;
import lombok.AllArgsConstructor;
import lombok.Builder;
import lombok.Getter;
import lombok.NoArgsConstructor;
import org.springframework.security.core.GrantedAuthority;
import org.springframework.security.core.authority.SimpleGrantedAuthority;
import org.springframework.security.core.userdetails.UserDetails;

import javax.persistence.*;
import java.util.ArrayList;
import java.util.Collection;
import java.util.List;
import java.util.stream.Collectors;

@Builder // builder를 사용할수 있게 합니다.
@Entity // jpa entity임을 알립니다.
@Getter // user 필드값의 getter를 자동으로 생성합니다.
@NoArgsConstructor // 인자없는 생성자를 자동으로 생성합니다.
@AllArgsConstructor // 인자를 모두 갖춘 생성자를 자동으로 생성합니다.
@Table(name = "user") // 'user' 테이블과 매핑됨을 명시
public class User implements UserDetails {
    @Id // pk
    @GeneratedValue(strategy = GenerationType.IDENTITY)
    private long msrl;
    @Column(nullable = false, unique = true, length = 50)
    private String uid;
    @JsonProperty(access = JsonProperty.Access.WRITE_ONLY)
    @Column(length = 100)
    private String password;
    @Column(nullable = false, length = 100)
    private String name;
    @Column(length = 100)
    private String provider;

    @ElementCollection(fetch = FetchType.EAGER)
    @Builder.Default
    private List<String> roles = new ArrayList<>();

    @Override
    public Collection<? extends GrantedAuthority> getAuthorities() {
        return this.roles.stream().map(SimpleGrantedAuthority::new).collect(Collectors.toList());
    }

    @JsonProperty(access = JsonProperty.Access.WRITE_ONLY)
    @Override
    public String getUsername() {
        return this.uid;
    }

    @JsonProperty(access = JsonProperty.Access.WRITE_ONLY)
    @Override
    public boolean isAccountNonExpired() {
        return true;
    }

    @JsonProperty(access = JsonProperty.Access.WRITE_ONLY)
    @Override
    public boolean isAccountNonLocked() {
        return true;
    }

    @JsonProperty(access = JsonProperty.Access.WRITE_ONLY)
    @Override
    public boolean isCredentialsNonExpired() {
        return true;
    }

    @JsonProperty(access = JsonProperty.Access.WRITE_ONLY)
    @Override
    public boolean isEnabled() {
        return true;
    }
}
bearer Token 테스트
Authorization서버(8081)와 Resource서버(8080)를 시작 합니다. 인증서버가 구동 되면 아래 주소를 실행하여 로그인하고 토큰을 얻습니다.
{
    "access_token": "a9237159-ecd1-4d51-9c7a-4ee080160519",
    "token_type": "bearer",
    "refresh_token": null,
    "expires_in": 35999,
    "scope": "read"
}
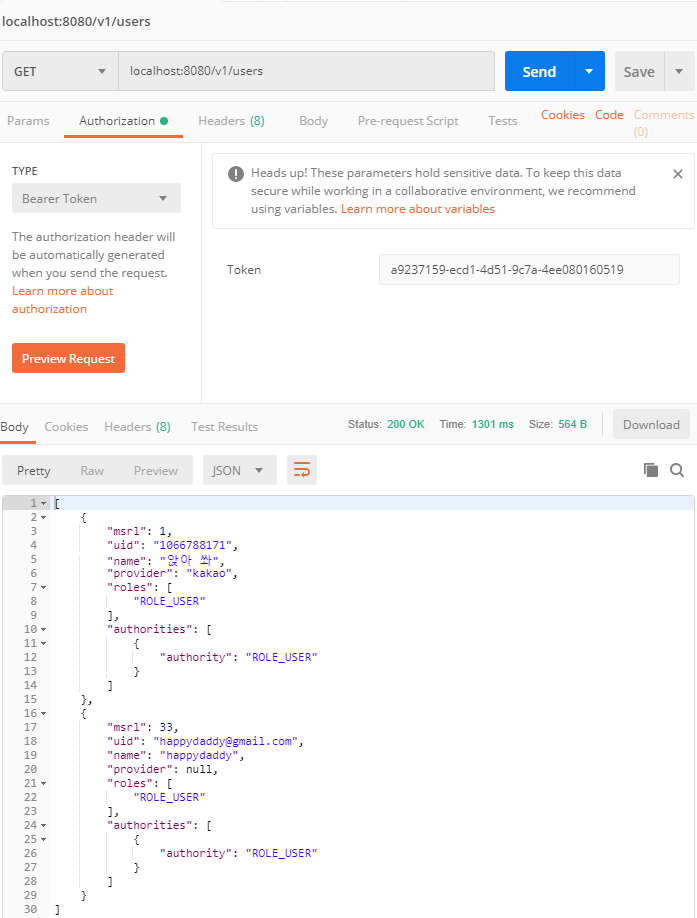
access토큰으로 리소스서버에 리소스를 요청합니다. 테스트는 postman을 이용합니다. (https://www.getpostman.com/downloads/)
올바른 토큰으로 리소스를 요청하였을경우 아래와 같이 유저 정보를 얻을수 있음을 확인할 수 있습니다.
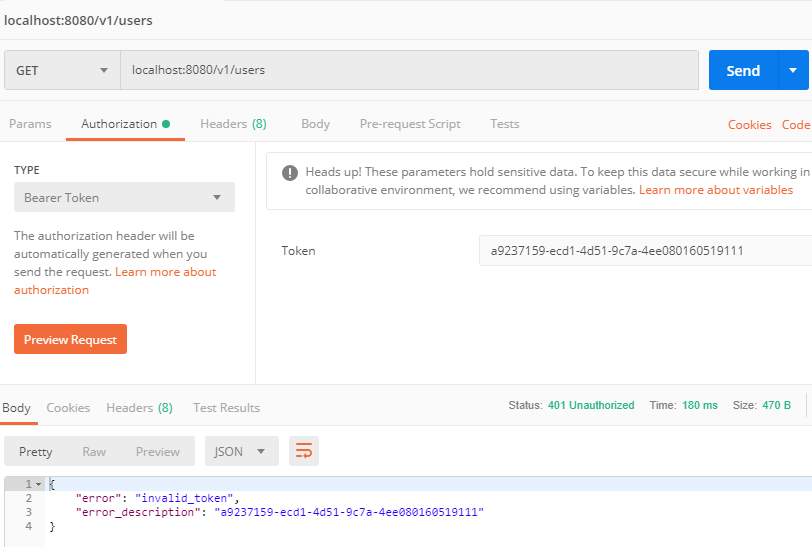
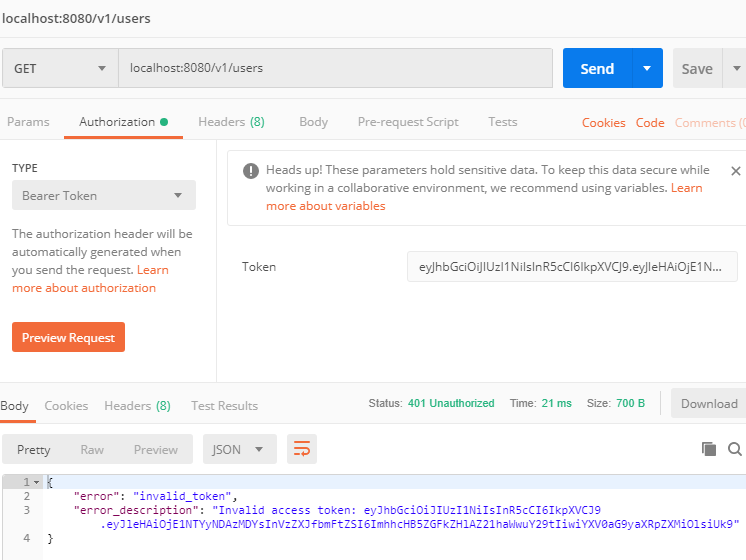
요번에는 토큰을 변형시켜서 테스트를 실패 해보겠습니다. 당연하지만 invalid token이 결과로 오면서 실패합니다. 인증(Authorization)서버의 로그를 살펴보면 예외가 발생했음을 확인할 수 있습니다. 여기서 알 수 있는점은 bearer토큰으로 리소스를 요청할때는 token검증을 위해 인증서버의 확인이 필요하다는 점입니다. Flow의 내용이 검증 되었습니다.

JWT Token을 통한 리소스 요청
이번에는 JWT방식으로 토큰을 변경하고 테스트 해보겠습니다. 인증서버의 세팅에서 아래와 같이 수정하여 JWT를 활성화시키고 서버를 리스타트 합니다. 인증 서버의 Oauth2AuthorizationConfig를 다음과 같이 수정합니다.
/**
* 토큰 정보를 DB를 통해 관리한다.
*
* @return
*/
//    @Override
//    public void configure(AuthorizationServerEndpointsConfigurer endpoints) {
//        endpoints.tokenStore(new JdbcTokenStore(dataSource)).userDetailsService(userDetailService);
//    }

/**
* 토큰 발급 방식을 JWT 토큰 방식으로 변경한다. 이렇게 하면 토큰 저장하는 DB Table은 필요가 없다.
*
* @param endpoints
* @throws Exception
*/
@Override
public void configure(AuthorizationServerEndpointsConfigurer endpoints) throws Exception {
    super.configure(endpoints);
    endpoints.accessTokenConverter(jwtAccessTokenConverter()).userDetailsService(userDetailService);
}

/**
* jwt converter를 등록
*
* @return
*/
@Bean
public JwtAccessTokenConverter jwtAccessTokenConverter() {
    JwtAccessTokenConverter converter = new JwtAccessTokenConverter();
    converter.setSigningKey(signKey);
    return converter;
}
리소스 서버의 설정 변경
application.yml 내용을 아래와 같이 변경합니다. bearer token 설정 부분은 주석처리하고 jwt 설정 내용을 추가합니다. signkey는 인증서버 세팅과 동일하게 세팅합니다.
security:
  oauth2:
#    client:
#      client-id: testClientId
#      client-secret: testSecret
#    resource:
#      token-info-uri: http://localhost:8081/oauth/check_token
    jwt:
      signkey: 123@#$
리소스 서버 Config 수정
Oauth2ResourceServerConfig 에 jwt 설정 내용을 추가합니다.
@Value("${security.oauth2.jwt.signkey}")
private String signKey;

@Bean
public TokenStore tokenStore() {
    return new JwtTokenStore(accessTokenConverter());
}

@Bean
public JwtAccessTokenConverter accessTokenConverter() {
    JwtAccessTokenConverter converter = new JwtAccessTokenConverter();
    converter.setSigningKey(signKey);
    return converter;
}
인증서버에서 로그인 후 JWT토큰을 얻습니다.
{
"access_token": "eyJhbGciOiJIUzI1NiIsInR5cCI6IkpXVCJ9.eyJleHAiOjE1NTYyNDAzMDYsInVzZXJfbmFtZSI6ImhhcHB5ZGFkZHlAZ21haWwuY29tIiwiYXV0aG9yaXRpZXMiOlsiUk9MRV9VU0VSIl0sImp0aSI6IjBlZjUxNzIxLTdkMTMtNDVmNi1hYzVkLTc1NjEwZDVlOWViMSIsImNsaWVudF9pZCI6InRlc3RDbGllbnRJZCIsInNjb3BlIjpbInJlYWQiXX0.QqDJTGSEhCJwUGD12uRIVOLuE-nuNkJmaxjZkXucHak",
"token_type": "bearer",
"refresh_token": null,
"expires_in": 35999,
"scope": "read"
}
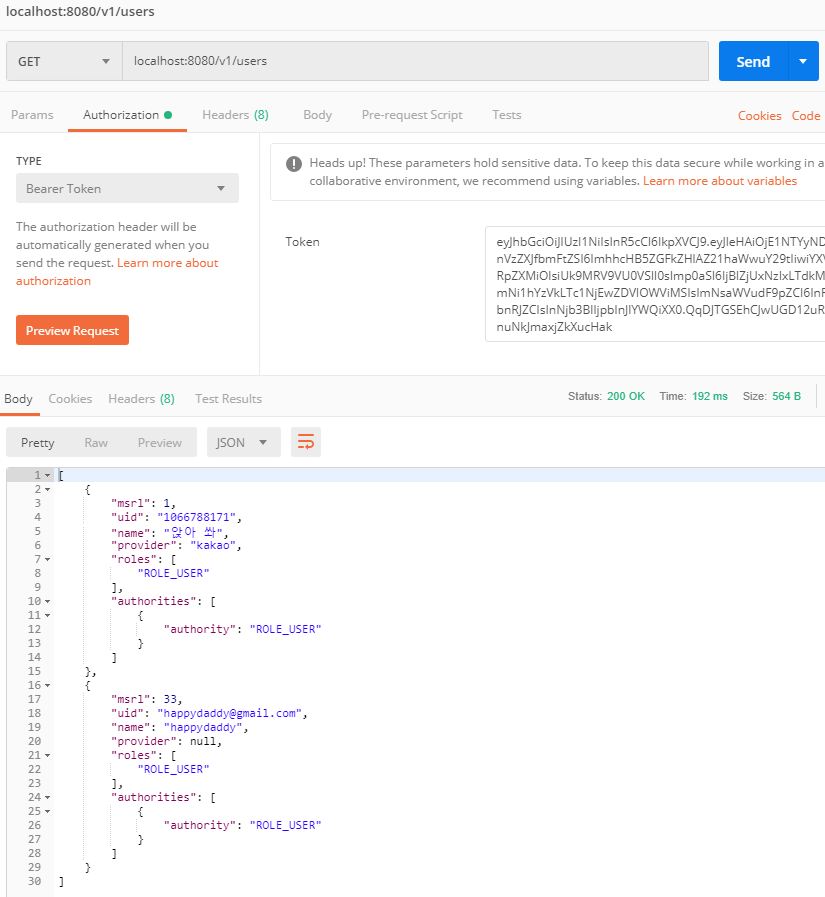
JWT 토큰으로 리소스를 요청합니다. JWT 토큰으로도 정상적인 결과를 얻을 수 있음을 확인하였습니다.
이번엔 JWT토큰을 변조하여 예외 테스트를 합니다. invalid_token 예외가 발생합니다. 이때 확인해야 할 점은 인증서버의 로그입니다. 인증서버의 로그에는 bearer토큰 인증 실패 때와는 달리 예외 로그가 남아있지 않습니다. 이로써 알수 있는 점은 JWT의 경우 자체 토큰만으로도 검증이 가능하므로 인증서버를 통해 검증을 하지 않는다는 것입니다.
간단한 리소스 서버를 완성하고 bearer토큰과 jwt토큰의 테스트까지 완료하였습니다. 더불어 테스트를 통해 bearer토큰과 jwt토큰의 차이점까지 정확히 알게 되었습니다.

 사용해보기")
