- aws lambda 개발하기(1) – 로컬 개발 환경 구축(node.js + serverless)
- aws lambda 개발하기(2) – hellolambda, Gateway 트리거
- aws lambda 개발하기(3) – node package(모듈)설치 및 개발, 환경변수 적용
- aws lambda 개발하기(4) – serverless로 트리거(trigger), 대상(destination), 실행역할(role), VPC, 기본 설정
- aws lambda 개발하기(5) – serverless plugin (offline, prune plugin)
- aws lambda 개발하기(6) – Multi Endpoint Restful api 개발
- aws lambda 개발하기(7) – CircleCI를 이용하여 자동 배포하기
- aws lambda 개발하기(8) – Asynchronous Tasks by SQS(Simple Queue Service)
- aws lambda 개발하기(9) – Lambda Layer 이용하여 배포 사이즈 줄이기
이번장에서는 node.js에 package(이하 모듈)를 설치하고 테스트 코드대신 실제 코드를 넣어보는 실습을 해보겠습니다. 그리고 환경별로 달라지는 변수에 대한 처리를 어떻게 할것인가도 살펴보겠습니다.
node 초기화
node에서 여러가지 모듈을 설치하고 사용하려면 초기화가 필요한데 프로젝트 디렉터리에서 npm init 명령을 실행합니다. npm은 Node Package Manager로서 모듈의 설치, 삭제, 업그레이드 및 의존성을 관리해 주는 프로그램입니다.
$ npm init -y
Wrote to /Users/abel/project-lambda/helloworld/package.json:

{
  "name": "helloworld",
  "version": "1.0.0",
  "description": "",
  "main": "handler.js",
  "scripts": {
    "test": "echo \"Error: no test specified\" && exit 1"
  },
  "keywords": [],
  "author": "",
  "license": "ISC"
}
명령을 수행하면 package.json이 생성됩니다.
helloworld
├── handler.js
├── package.json
└── serverless.yml
package(모듈) 설치
사용하고자 하는 모듈을 npm install 명령으로 설치할 수 있습니다. 관련 내용은 package.json에 작성됩니다. 실습에서는 redis, mysql, http 관련 모듈을 설치하고 해당 모듈을 활용하여 코드를 작성해 보겠습니다.
 $ npm i redis
 $ npm i mysql
 $ npm i http
package.json
{
  "name": "helloworld",
  "version": "1.0.0",
  "description": "",
  "main": "handler.js",
  "scripts": {
    "test": "echo \"Error: no test specified\" && exit 1"
  },
  "keywords": [],
  "author": "",
  "license": "ISC",
  "dependencies": {
    "http": "0.0.0",
    "mysql": "^2.18.1",
    "redis": "^3.0.2"
  },
  "devDependencies": {
    "serverless-offline": "^5.12.1"
  }
}
설치한 모듈은 js상에서 require(‘모듈명’)으로 선언하고 사용할 수 있습니다. 로컬환경에 Redis, Mysql이 설치되어 있다고 가정하고 handler.js 아래와 같이 코드를 작성합니다.
redis, mysql, http function을 하나씩 생성하고 동작을 확인하는 간단한 프로그램을 작성합니다. node.js는 이벤트 기반, 논 블로킹 I/O 모델이므로 예제에서는 Promise와 await를 사용하여 비동기 방식으로 로직을 처리하도록 작성하였습니다.
'use strict';

// 사용할 모듈 선언
const redis = require('redis');
const mysql = require('mysql');
const http = require('http');

// REDIS에 데이터를 set한 후 get하는 예제
function setGetByRedis() {
  return new Promise((resolve, reject) => {
    // Redis
    const redis_client = redis.createClient({
      host: "localhost",
      port:6379
    });
    redis_client.set('lambda','Hello Lambda', (err, result) => {
      if(result)
        console.log("redis-set-result:",result);

      if(err)
        console.log("redis-set-error:",err);
    });
    redis_client.get('lambda', (err, result) => {
      if(result)
        resolve(result);

      if(err)
        console.log("redis-get-error:",err);
    });
    redis_client.quit();
  });
}

// MYSQL 테이블에서 데이터를 5개 조회하는 예제
function getCommentByDB() {
  return new Promise((resolve, reject) => {
    // Mysql
    const mysql_connection = mysql.createConnection({
      host: 'localhost',
      port: 3306,
      user: 'root',
      password: 'password',
      database: 'page-community'
    });

    mysql_connection.connect();
    mysql_connection.query('select * from comment order by id desc limit 5', function(err, result, field) {
        if(result)
          resolve(result);

        if(err)
          console.log("db-error:",err);
    });
    mysql_connection.end();
  });
}

// REST API를 호출하고 결과 JSON을 읽어서 화면에 출력하는 예제
function getUsersByHttp() {
  return new Promise((resolve, reject) => {
    const options = {
      host: 'jsonplaceholder.typicode.com',
      port: 80,
      path: '/users',
      method: 'GET',
      headers: {
        'Content-Type': 'application/json'
      }
    }
    const request = http.request(options, function(response) {
      let body = '';
      response.on('data', function(data) {
        body += data;
      })
      response.on('end', function() {
        resolve(JSON.parse(body));
      });
      response.on('error', function(err) {
        console.log("http-error:",err);
      });
    });
    request.end();
  });
}

module.exports.hello = async event => {
  const redisResult = await setGetByRedis();
  console.log("1. REDIS RESULT");
  console.log(redisResult);

  const dbResult = await getCommentByDB();
  console.log("2. DB RESULT");
  if(dbResult) {
    dbResult.forEach(comment => {
      console.log("id = %d, comment = %s", comment.id, comment.comment);
    });
  }

  const httpResult = await getUsersByHttp();
  console.log("3. HTTP RESULT");
  if(httpResult) {
    httpResult.forEach(user => {
      console.log("id = %d, name = %s, email = %s", user.id, user.name, user.email);
    });
  }
};
위의 내용을 local에서 실행하면 아래와 같은 데이터가 출력됩니다.
$ sls invoke local -f hello
redis-set-result: OK
1. REDIS RESULT
Hello Lambda
2. DB RESULT
id = 238, comment = 고고고고고
id = 237, comment = sa
id = 236, comment = hi
id = 235, comment = test
id = 234, comment = yyyy
3. HTTP RESULT
id = 1, name = Leanne Graham, email = Sincere@april.biz
id = 2, name = Ervin Howell, email = Shanna@melissa.tv
id = 3, name = Clementine Bauch, email = Nathan@yesenia.net
id = 4, name = Patricia Lebsack, email = Julianne.OConner@kory.org
id = 5, name = Chelsey Dietrich, email = Lucio_Hettinger@annie.ca
id = 6, name = Mrs. Dennis Schulist, email = Karley_Dach@jasper.info
id = 7, name = Kurtis Weissnat, email = Telly.Hoeger@billy.biz
id = 8, name = Nicholas Runolfsdottir V, email = Sherwood@rosamond.me
id = 9, name = Glenna Reichert, email = Chaim_McDermott@dana.io
id = 10, name = Clementina DuBuque, email = Rey.Padberg@karina.biz
function의 모듈화
위의 코드는 잘 작동하지만 handler.js가 비대해지는 문제점이 있습니다. 각각의 function을 모듈화 하여 hanlder.js에서 호출해서 사용하도록 수정해 보겠습니다. 프로젝트 root에 module 디렉터리를 생성하고 모듈 파일을 생성합니다.
$ mkdir module
$ cd module
$ touch db_module.js
$ touch http_module.js
$ touch redis_module.js
디렉터리 구조는 다음과 같습니다.
helloworld
├── handler.js
├── module
│   ├── db_module.js
│   ├── http_module.js
│   └── redis_module.js
├── node_modules
│   ├── @hapi
│   ├── @sindresorhus
│   ├── @szmarczak
│   ├── ansi-align
│   ├── ansi-regex
│   ├── ansi-styles
│   ├── bignumber.js
// 내용이 많아 중간 생략
│   ├── websocket-framed
│   ├── which
│   ├── widest-line
│   ├── wrappy
│   ├── write-file-atomic
│   ├── ws
│   ├── xdg-basedir
│   └── yallist
├── package-lock.json
├── package.json
└── serverless.yml
각각의 module 내용을 작성합니다. db_module의 경우 상단에 mysql 모듈을 적용하고 module.exports = {} 에 기존 function의 내용을 가져와 적용합니다. 나머지 http_module, redis_module도 동일하게 작업합니다.
db_module.js
const mysql = require('mysql');

module.exports = {
    getCommentByDB: () => new Promise((resolve, reject) => {
    // Mysql
    const mysql_connection = mysql.createConnection({
      host: 'localhost',
      port: 3306,
      user: 'root',
      password: 'password',
      database: 'page-community'
    });

    mysql_connection.connect();
    mysql_connection.query('select * from comment order by id desc limit 5', function(err, result, field) {
        if(result)
          resolve(result);

        if(err)
          console.log("db-error:",err);
    });
    mysql_connection.end();
  })
}
http_module.js
const http = require('http');

module.exports = {
  getUsersByHttp: () => new Promise((resolve, reject) => {
    const options = {
      host: 'jsonplaceholder.typicode.com',
      port: 80,
      path: '/users',
      method: 'GET',
      headers: {
        'Content-Type': 'application/json'
      }
    }
    const request = http.request(options, function(response) {
      let body = '';
      response.on('data', function(data) {
        body += data;
      })
      response.on('end', function() {
        resolve(JSON.parse(body));
      });
      response.on('error', function(err) {
        console.log("http-error:",err);
      });
    });
    request.end();
  })
}
redis_module.js
const redis = require('redis');

module.exports = {
  setGetByRedis: () => new Promise((resolve, reject) => {
    // Redis
    const redis_client = redis.createClient({
      host: "localhost",
      port:6379
    });
    redis_client.set('lambda','Hello Lambda', (err, result) => {
      if(result)
        console.log("redis-set-result:",result);

      if(err)
        console.log("redis-set-error:",err);
    });
    redis_client.get('lambda', (err, result) => {
      if(result)
        resolve(result);

      if(err)
        console.log("redis-get-error:",err);
    });
    redis_client.quit();
  })
}
handler.js 파일에서 기존 function은 삭제하고 위의 모듈을 require로 선언한 후 사용하도록 변경합니다. handler.js의 코드가 훨씬 간결해지는 것을 확인할 수 있습니다.
'use strict';

// 사용할 모듈 선언
const redis = require('redis');
const mysql = require('mysql');
const http = require('http');
const dbModule = require('./module/db_module');
const redisModule = require('./module/redis_module');
const httpModule = require('./module/http_module');

module.exports.hello = async event => {
  const redisResult = await redisModule.setGetByRedis();
  console.log("1. REDIS RESULT");
  console.log(redisResult);

  const dbResult = await dbModule.getCommentByDB();
  console.log("2. DB RESULT");
  if(dbResult) {
    dbResult.forEach(comment => {
      console.log("id = %d, comment = %s", comment.id, comment.comment);
    });
  }

  const httpResult = await httpModule.getUsersByHttp();
  console.log("3. HTTP RESULT");
  if(httpResult) {
    httpResult.forEach(user => {
      console.log("id = %d, name = %s, email = %s", user.id, user.name, user.email);
    });
  }
};
결과를 호출해보면 모듈화 하기전과 결과가 동일한 것을 확인할 수 있습니다.
$ sls invoke local -f hello
redis-set-result: OK
1. REDIS RESULT
Hello Lambda
2. DB RESULT
id = 238, comment = 고고고고고
id = 237, comment = sa
id = 236, comment = hi
id = 235, comment = test
id = 234, comment = yyyy
3. HTTP RESULT
id = 1, name = Leanne Graham, email = Sincere@april.biz
id = 2, name = Ervin Howell, email = Shanna@melissa.tv
id = 3, name = Clementine Bauch, email = Nathan@yesenia.net
id = 4, name = Patricia Lebsack, email = Julianne.OConner@kory.org
id = 5, name = Chelsey Dietrich, email = Lucio_Hettinger@annie.ca
id = 6, name = Mrs. Dennis Schulist, email = Karley_Dach@jasper.info
id = 7, name = Kurtis Weissnat, email = Telly.Hoeger@billy.biz
id = 8, name = Nicholas Runolfsdottir V, email = Sherwood@rosamond.me
id = 9, name = Glenna Reichert, email = Chaim_McDermott@dana.io
id = 10, name = Clementina DuBuque, email = Rey.Padberg@karina.biz
여러개의 비동기 함수를 동시에 수행하도록 처리
위의 코드는 각각의 모듈이 비동기로 작성되어있고 handler.js에서 호출해서 사용하고 있습니다. 그런데 호출시 await를 사용하면 해당 부분이 처리될때까지 blocking되므로 비효율 적입니다. 3개의 요청을 한번에 수행하고 결과를 처리하도록 Promise.all을 사용하여 handler.js를 수정합니다.
'use strict';

// 사용할 모듈 선언
const dbModule = require('./module/db_module');
const redisModule = require('./module/redis_module');
const httpModule = require('./module/http_module');

module.exports.hello = async event => {

  const[redisResult, dbResult, httpResult] = await Promise.all([redisModule.setGetByRedis(), dbModule.getCommentByDB(), httpModule.getUsersByHttp()]);

  console.log("1. REDIS RESULT");
  console.log(redisResult);

  console.log("2. DB RESULT");
  if(dbResult) {
    dbResult.forEach(comment => {
      console.log("id = %d, comment = %s", comment.id, comment.comment);
    });
  }

  console.log("3. HTTP RESULT");
  if(httpResult) {
    httpResult.forEach(user => {
      console.log("id = %d, name = %s, email = %s", user.id, user.name, user.email);
    });
  }
};
동시처리를 하면 이전보다 응답속도를 개선할 수 있습니다. 결과는 역시 동일하므로 생략하도록 하겠습니다.
환경변수 적용
위에서 작성한 코드는 로컬 개발환경에 맞춰진 코드입니다. 서버에 배포할 경우 서버환경에 맞게 redis, mysql등의 connection정보가 변경될 필요가 있습니다. 해당 정보들은 환경마다 다르게 적용되야 하므로 환경변수를 적용하도록 하겠습니다.
프로젝트 root에 환경변수 파일을 담을 env 디렉터리를 만듭니다. 그리고 하위에 환경별 json파일을 생성합니다.
$ mkdir env
$ cd env
$ touch local.json
$ touch dev.json
$ touch prod.json
생성한 파일에 환경변수를 Json 형태로 작성합니다. 아래는 local.json 파일을 작성한 것입니다. dev.json, prod.json도 환경에 맞게 작성합니다.
{
   "DB_HOST:"localhost"
   "DB_PORT:3306
   "DB_USER:"root"
   "DB_PASSWD:"password"
   "DB_NAME:"page-community"
   "REDIS_HOST:"localhost"
   "REDIS_PORT:6379"
}
serverless.yml 파일에 다음 내용을 추가합니다. 아래 내용을 작성하면 테스트시에는 local.json의 환경변수를 사용하고 배포시에는 stage 정보( dev, prod )에 따라 각각의 파일을 사용하게 됩니다.
service: lambda-ranking-hourly

custom:
  env: ${file(./env/${opt:stage,'local'}.json)}

provider:
   // 중간 내용 생략
    environment:
        DB_HOST: ${self:custom.env.DB_HOST}
        DB_PORT: ${self:custom.env.DB_PORT}
        DB_USER: ${self:custom.env.DB_USER}
        DB_PASSWD: ${self:custom.env.DB_PASSWD}
        DB_NAME: ${self:custom.env.DB_NAME}
        REDIS_HOST: ${self:custom.env.REDIS_HOST}
        REDIS_PORT: ${self:custom.env.REDIS_PORT}

// 나머지 내용 생략
모듈파일 상단에 하드코딩 되어있던 커넥션 정보를 환경변수로 변경합니다. 환경변수는 process.env.[변수명] 으로 사용가능합니다.
db_module.js
const mysql = require('mysql');

module.exports = {
    getCommentByDB: () => new Promise((resolve, reject) => {
    // Mysql
    const mysql_connection = mysql.createConnection({
      host: process.env.DB_HOST,
      port: process.env.DB_PORT,
      user: process.env.DB_USER,
      password: process.env.DB_PASSWD,
      database: process.env.DB_NAME
    });

    mysql_connection.connect();
    mysql_connection.query('select * from comment order by id desc limit 5', function(err, result, field) {
        if(result)
          resolve(result);

        if(err)
          console.log("db-error:",err);
    });
    mysql_connection.end();
  })
}
redis_module.js
const redis = require('redis');

module.exports = {
  setGetByRedis: () => new Promise((resolve, reject) => {
    // Redis
    const redis_client = redis.createClient({
      host: process.env.REDIS_HOST,
      port: process.env.REDIS_PORT
    });
    redis_client.set('lambda','Hello Lambda', (err, result) => {
      if(result)
        console.log("redis-set-result:",result);

      if(err)
        console.log("redis-set-error:",err);
    });
    redis_client.get('lambda', (err, result) => {
      if(result)
        resolve(result);

      if(err)
        console.log("redis-get-error:",err);
    });
    redis_client.quit();
  })
}
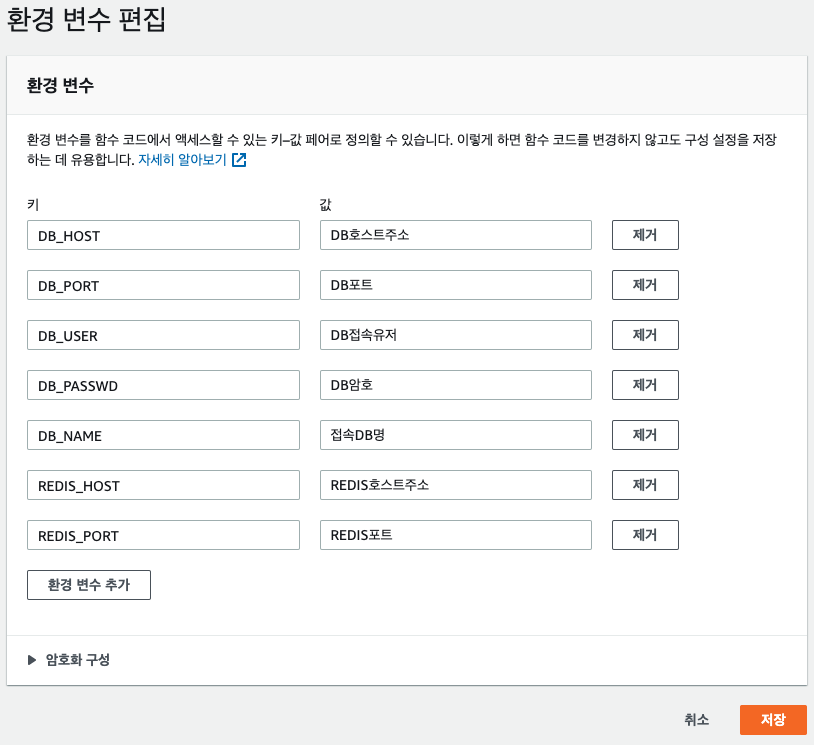
이제 로컬에서 테스트(sls invoke local -f hello)해보면 문제없이 동작하는 것을 확인할 수 있습니다. 서버에 배포하면 stage 환경에 맞는 json 파일의 내용이 자동으로 환경변수로 등록됩니다. 배포 완료 후 aws console의 lambda 함수 상세화면에 들어가면 아래와 같이 자동으로 등록된 환경변수를 확인할 수 있습니다.

실습 코드 GitHub 주소
https://github.com/codej99/SeverlessAwsLambda


