- Spring Rest api + Angular framework로 웹사이트 만들기(1) – 프로젝트 구성 및 반응형 레이아웃 구현
- Spring Rest api + Angular framework로 웹사이트 만들기(2) – 로그인/가입(HttpClient, Proxy, Validation)
- Spring Rest api + Angular framework로 웹사이트 만들기(3) – 내정보(Interceptor, Router Guard)
- Spring Rest api + Angular framework로 웹사이트 만들기(4) – 게시판(CRUD)
- Spring Rest api + Angular framework로 웹사이트 만들기(5) – 개선사항 적용 (custom alert/confirm dialog, resolve, 404page)
- Spring Rest api + Angular framework로 웹사이트 만들기(6) – 개선사항 적용 (loading spinner)
이번 장에는 페이지가 완전히 로딩되기전에 보여지는 로딩 스피너를 웹화면에 적용해 보겠습니다. 현재까지 개발된 화면들은 모두 가벼운 로직으로 이루어진 화면들이라 빠르게 로딩되지만 무거운 로직이 필요한 화면이나, 데이터 입력등 응답에 시간이 오래 걸리는 화면 작성시엔 더 나은 사용자 경험을 주기 위해 로딩 화면을 제공하는 것이 좋습니다.
로딩 화면 컴포넌트 생성
로딩 화면은 총 2개의 UI가 필요합니다. 첫번째는 빙글빙글 도는 로딩 스피너 화면 두번째는 로딩 스피너 배경을 회색으로 덮는 오버레이 화면입니다. 로딩 스피너는 오버레이 화면의 가운데에 표시됩니다.
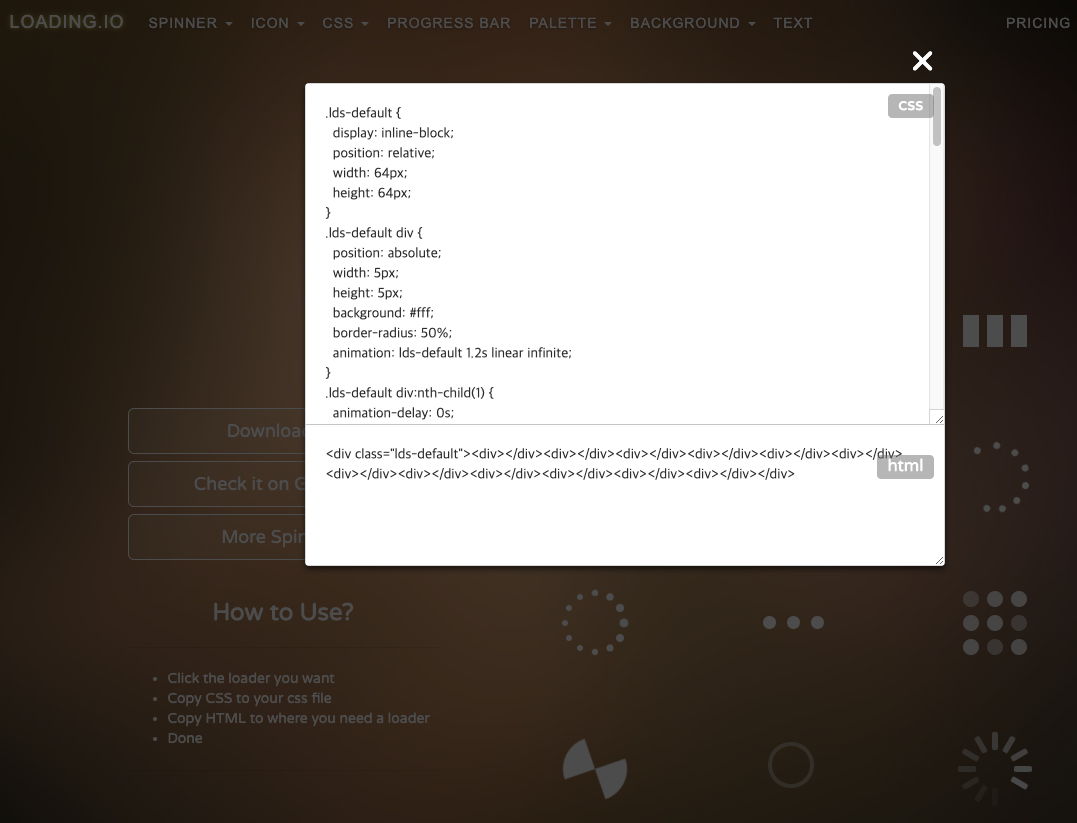
로딩스피너는 html과 css를 이용해서 애니메이션을 그려야 하는데요. 이미 사용중인 스피너 애니메이션이 없다면 아래 사이트에서 다양한 스피너의 CSS와 HTML을 제공하므로 가져다가 사용하면 됩니다. 강의에서는 아래 사이트의 스피너를 가져와 개발하겠습니다.

$ cd src/app/component/common
$ ng g c loading-spinner --spec false
CREATE src/app/component/common/loading-spinner/loading-spinner.component.css
CREATE src/app/component/common/loading-spinner/loading-spinner.component.html
CREATE src/app/component/common/loading-spinner/loading-spinner.component.ts
$ cd loading-spinner
$ ng g c loading-spinner-overlay --flat --spec false
CREATE src/app/component/common/loading-spinner/loading-spinner-overlay.component.css
CREATE src/app/component/common/loading-spinner/loading-spinner-overlay.component.html
CREATE src/app/component/common/loading-spinner/loading-spinner-overlay.component.ts
로딩 스피너 html 작성
// loading-spinner.component.html
<div class="lds-default">
    <div></div>
    <div></div>
    <div></div>
    <div></div>
    <div></div>
    <div></div>
    <div></div>
    <div></div>
    <div></div>
    <div></div>
    <div></div>
    <div></div>
</div>
로딩 스피너 스타일 작성
// loading-spinner.component.css
.lds-default {
    display: inline-block;
    position: relative;
    width: 64px;
    height: 64px;
}
.lds-default div {
    position: absolute;
    width: 5px;
    height: 5px;
    background: #000;
    border-radius: 50%;
    animation: lds-default 1.2s linear infinite;
}
.lds-default div:nth-child(1) {
    animation-delay: 0s;
    top: 29px;
    left: 53px;
}
.lds-default div:nth-child(2) {
    animation-delay: -0.1s;
    top: 18px;
    left: 50px;
}
.lds-default div:nth-child(3) {
    animation-delay: -0.2s;
    top: 9px;
    left: 41px;
}
.lds-default div:nth-child(4) {
    animation-delay: -0.3s;
    top: 6px;
    left: 29px;
}
.lds-default div:nth-child(5) {
    animation-delay: -0.4s;
    top: 9px;
    left: 18px;
}
.lds-default div:nth-child(6) {
    animation-delay: -0.5s;
    top: 18px;
    left: 9px;
}
.lds-default div:nth-child(7) {
    animation-delay: -0.6s;
    top: 29px;
    left: 6px;
}
.lds-default div:nth-child(8) {
    animation-delay: -0.7s;
    top: 41px;
    left: 9px;
}
.lds-default div:nth-child(9) {
    animation-delay: -0.8s;
    top: 50px;
    left: 18px;
}
.lds-default div:nth-child(10) {
    animation-delay: -0.9s;
    top: 53px;
    left: 29px;
}
.lds-default div:nth-child(11) {
    animation-delay: -1s;
    top: 50px;
    left: 41px;
}
.lds-default div:nth-child(12) {
    animation-delay: -1.1s;
    top: 41px;
    left: 50px;
}
@keyframes lds-default {
    0%, 20%, 80%, 100% {
      transform: scale(1);
    }
    50% {
      transform: scale(1.5);
    }
}
로딩화면 오버레이 html
오버레이 html의 내용을 보면 로딩 스피너(app-loading-spinner)를 감싸고 있는것을 볼수 있습니다.
<div class="wrapper">
    <div class="overlay">
        <div class="spinner-wrapper">
        <app-loading-spinner></app-loading-spinner>
        </div>
    </div>
</div>
로딩화면 오버레이 css
오버레이 화면은 배경을 옅은 회색으로 가득 채우고 화면 정중앙에 로딩 스피너를 노출시키도록 스타일을 작성합니다.
.wrapper {
    width: 100%;
    height: 100%;
}

.overlay {
    position: absolute;
    z-index: 1002;
    background-color: rgba(255, 255, 255, 0.5);
    width: 100%;
    height: 100%;
}

.spinner-wrapper {
    position: fixed;
    width: 100%;
    height: 100%;
    display: flex;
    justify-content: center;
    align-items: center;
    top: 0;
    left: 0;
    background-color: rgba(255, 255, 255, 0.5);
    z-index: 998;
}

.spinner-wrapper app-loading-spinner {
    width: 6rem;
    height: 6rem;
}
APP 모듈에 등록
로딩 스피너와 오버레이 화면을 APP모듈에 등록합니다. 로딩화면은 다른 컴포넌트에서 호출이 되고 컴포넌트들이 만들어지기 전에 로딩되야 하므로 declarations, entryComponents 두곳에 모두 선언합니다.
// import 생략
import { LoadingSpinnerOverlayComponent } from './component/common/loading-spinner/loading-spinner-overlay.component';
import { LoadingSpinnerService } from './service/loading-spinner/loading-spinner.service';

@NgModule({
  declarations: [
    // 생략
    LoadingSpinnerComponent,
    LoadingSpinnerOverlayComponent
  ],
  imports: [
    // 생략
  ],
  providers: [
    // 생략
  ],
  entryComponents: [
    // 생략
    LoadingSpinnerComponent,
    LoadingSpinnerOverlayComponent
  ],
  bootstrap: [AppComponent]
})
export class AppModule { }
로딩 서비스 생성
Angular는 화면에 떠있는 패널을 구현하기위해, 즉 화면과 화면을 겹치게 표현하기 위해 Overlay기능을 제공합니다. 자세한 내용은 아래 링크에서 확인 할 수 있습니다.
https://material.angular.io/cdk/overlay/overview
로딩 화면이 컴포넌트의 화면에 오버레이로 보여지거나 사라지게 하는 기능을 제공하는 서비스를 작성합니다.
$ cd /src/service
$ mkdir loading-spinner
$ cd loading-spinner
$ ng g s loading-spinner --spec false
show() 메서드는 OverlayRef객체을 하나 생성하고 LoadingSpinnerOverlay 컴포넌트를 OverlayRef객체에 붙이는(attach) 기능을 합니다. 즉 현재 화면에 로딩 스피너를 오버레이로 띄웁니다. hide() 메서드는 show() 메서드에서 붙인 LoadingSpinnerOverlay 컴포넌트를 OverlayRef 객체에서 제거(detach)하는 기능을 제공합니다. 즉 현재 화면에서 로딩 스피너를 제거합니다.
// loading-spinner.service.ts
import { Injectable } from '@angular/core';
import { ComponentPortal } from '@angular/cdk/portal';
import { LoadingSpinnerOverlayComponent } from '../../component/common/loading-spinner/loading-spinner-overlay.component';
import { OverlayRef, Overlay } from '@angular/cdk/overlay';

@Injectable({
  providedIn: 'root'
})
export class LoadingSpinnerService {

  private overlayRef: OverlayRef = null;

  constructor(private overlay: Overlay) {}

  public show() {

    if (!this.overlayRef) {
      this.overlayRef = this.overlay.create();
    }

    const spinnerOverlayPortal = new ComponentPortal(LoadingSpinnerOverlayComponent);
    this.overlayRef.attach(spinnerOverlayPortal);
  }

  public hide() {
    if (!!this.overlayRef) {
      this.overlayRef.detach();
    }
  }
}
APP 모듈에 서비스 등록
다른 컴포넌트에서 사용할 수 있도록 APP모듈의 providers에 LoadingSpinnerService를 등록합니다.
// app.module.ts
// import 생략
import { LoadingSpinnerService } from './service/loading-spinner/loading-spinner.service';

@NgModule({
  declarations: [
    // 생략
  ],
  imports: [
    // 생략
  ],
  providers: [
    // 생략
    LoadingSpinnerService
  ],
  entryComponents: [
    // 생략
  ],
  bootstrap: [AppComponent]
})
export class AppModule { }
화면 전환시 로딩 스피너가 오버레이 되도록 처리
화면 전환에 대한 이벤트를 캐치하여 로딩 스피너를 화면 전환시 오버레이 되도록 처리합니다. 모든 화면에 적용되야 하므로 app.component.ts에 관련 내용을 작성합니다. constructor에 화면전환이 일어나는 이벤트를 구독하도록 router의 event를 구독합니다. router에 발생한 이벤트가 화면전환의 시작(NavigationStart)이면 로딩 스피너를 노출시킵니다. router에 발생한 이벤트가 화면전환완료(NavigationEnd) 또는 화면전환취소(NavigationCancel)또는 화면전환오류(NavigationError)일경우 화면에 오버레이된 로딩 스피너를 제거합니다.
// app.component.ts
import { Component } from '@angular/core';
import { SignService } from './service/rest-api/sign.service';
import { LoadingSpinnerService } from './service/loading-spinner/loading-spinner.service';
import { Router, RouterEvent, NavigationStart, NavigationEnd, NavigationCancel, NavigationError } from '@angular/router';

@Component({
  selector: 'app-root',
  templateUrl: './app.component.html',
  styleUrls: ['./app.component.css']
})
export class AppComponent {
  constructor(
    private router: Router,
    private signService: SignService,
    private loadingSpinnerService: LoadingSpinnerService
  ) {
    // 화면전환이 일어나는 이벤트를 구독한다.
    router.events.subscribe((event: RouterEvent) => {
      this.updateLoadingSpinner(event);
    });
  }

  private updateLoadingSpinner(event: RouterEvent): void {
    // 화면전환이 시작될때 로딩 스피너를 노출시킨다.
    if (event instanceof NavigationStart) {
      console.log("NavigationStart");
      this.loadingSpinnerService.show();
    }
    // 화면전환이 완료되었거나 취소되었거나 오류가 발생하면 로딩 스피너를 감춘다.
    if (event instanceof NavigationEnd
      || event instanceof NavigationCancel
      || event instanceof NavigationError) {
        console.log("NavigationEnd");
        this.loadingSpinnerService.hide();
    }
  }
}
로딩 화면 테스트
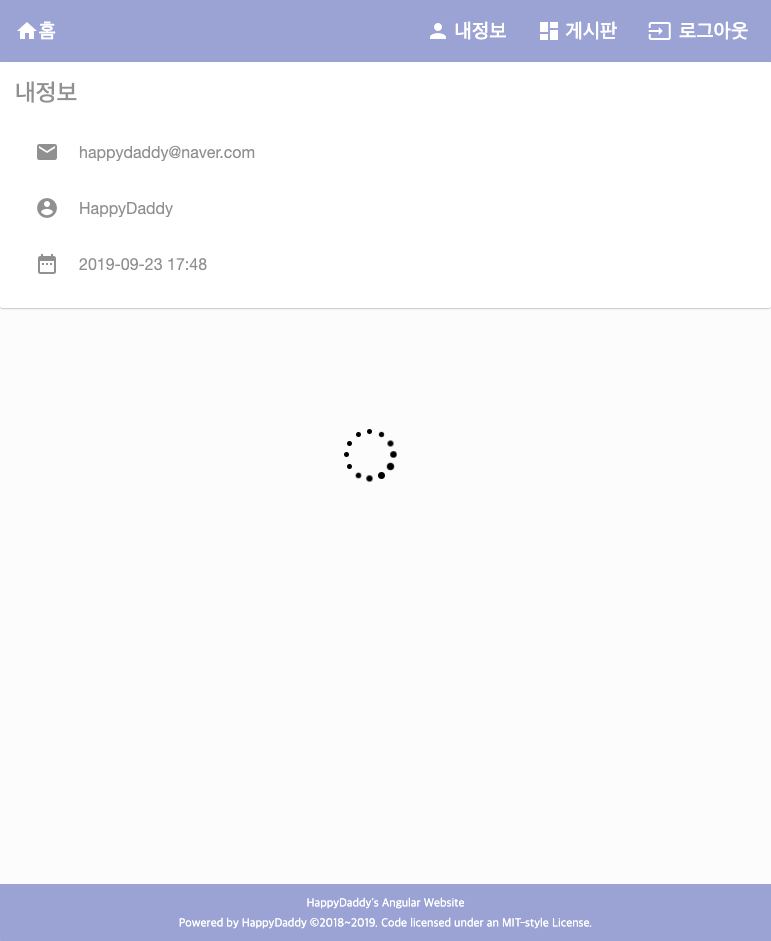
모든 작업이 완료되었습니다. 서버를 다시 띄우고 화면 전환 이벤트가 발생시키면 아래와 같이 로딩 스피너가 오버레이로 노출되었다가 사라지는 것을 볼수 있습니다.

실습을 통해 페이지에 로딩 스피너를 적용해 보았습니다. 이제 느린 페이지 로딩시에도 사용자에게 보다 친숙한 UX를 제공할 수 있게 되었습니다.
실습에 사용한 소스는 아래 Github 링크에서 확인 가능합니다.
https://github.com/codej99/angular-website.git – feature/loading-spinner 브랜치
Spring Boot2로 백엔드 서버(RestAPI) 구축하기 시리즈


