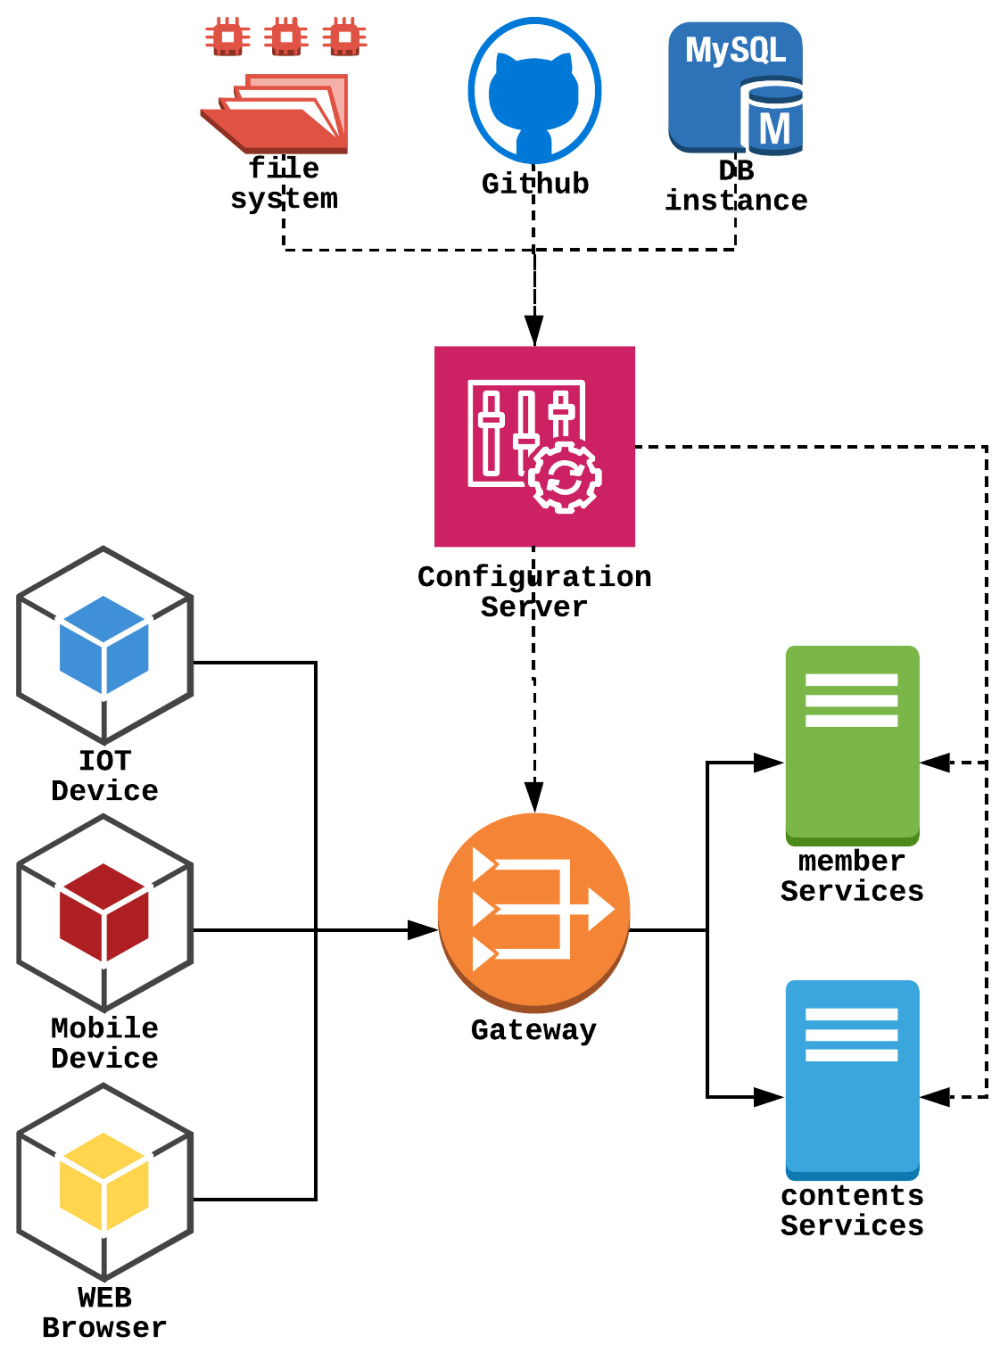
- Spring Cloud MSA(1) – Configuration server 구성
- Spring Cloud MSA(2) – Gateway(Routing & Filter) Server by Netflix zuul
- Spring Cloud MSA(3) – Service Discovery by Eureka
이번장에서는 Spring Cloud를 이용하여 Gateway(Routing & Filter)서버를 구축해 보도록 하겠습니다. SpringCloud에서 Gateway는 서로 분산되어있는 서비스들을 하나로 모아주는 관문같은 역할입니다.
기존의 로드밸런서, 리버스 프락시
기존의 리버스 프락시나 로드밸런서는 특정 요청 또는 URI에 대해 매핑될 서버의 ip나 도메인을 사전에 등록해놓아야 합니다. 등록이나 수정하는 과정에서 프로세스의 재시작이 필요할수도 있고 그에 따른 순단이 발생할수도 있습니다. 이러한 점은 시스템 운영을 위한 추가적인 인력이나 리소스가 필요하다는 것으로 해석할 수 있습니다.
Spring Cloud Gateway의 차별점
Spring Cloud Gateway는 다수의 서비스 엔드포인트를 하나로 통일하고 트래픽의 특성에 따라 알맞는 서비스로 라우팅 할 수 있는 기능을 제공합니다. 라우팅 설정은 무중단으로 적용할 수 있는 방법이 제공됩니다. 클라이언트 입장에서는 엔드포인트가 한군데로 통일되므로 연동시 고려해야될 관리 포인트가 줄어들게 됩니다.
서비스 제공자 입장에서는 트래픽을 한군데로 모을때 다음과 같은 장점이 있습니다.
- 유입되는 모든 요청/응답을 관리 할 수 있게 되므로 앞 단에 인증 및 보안을 적용하기가 좋습니다.
- URI에 따라 서비스 엔드포인트를 다르게 가져가는 동적 라우팅이 가능해집니다. 한가지 예를 들면 도메인 변경없이 레거시 시스템을 신규 시스템으로 점진적으로 교체해나가야 하는 작업에 유연하게 대처할 수 있습니다.
- 모든 트래픽을 감시할수 있으므로 모니터링 시스템 구성이 단순해집니다.
- 동적 라우팅이 가능하므로 신규 스펙을 서비스 일부에만 적용하거나, 트래픽을 점진적으로 늘려가는 테스트를 수행할 수 있습니다.

Configuration 서버에 Gateway Router 설정 추가
Gateway 서버에서 사용할 환경설정 정보를 Configuration 서버에서 조회할 수 있도록 설정을 추가합니다.
local 환경 설정
local 디렉터리 ${user.home}/server-configs 하위에 zuul gateway 설정 파일을 추가합니다.
$ pwd
/Users/happydaddy/server-configs
$ ls
member-service-local.yml        contents-service-local.yml        zuul-gateway-local.yml
접근 path에 따라 다른 서비스(8080 or 8081)로 라우팅 되도록 설정합니다.
# zuul-gateway-local.yml
spring:
  profiles: local
zuul:
  routes:
    member:
      stripPrefix: false
      path: /v1/member/**
      url: http://localhost:8080
    pay:
      stripPrefix: false
      path: /v1/pay/**
      url: http://localhost:8081
    else:
      stripPrefix: false
      path: /v1/**
      url: http://localhost:8081
alpha 환경 설정 추가
GitHub의 server-configs 하위에 zuul-gateway-alpha.yml을 추가하고 내용작성후 커밋합니다.
# zuul-gateway-alpha.yml
spring:
  profiles: alpha
zuul:
  routes:
    member:
      stripPrefix: false
      path: /v1/member/**
      url: http://localhost:8080
    pay:
      stripPrefix: false
      path: /v1/pay/**
      url: http://localhost:8081
    else:
      stripPrefix: false
      path: /v1/**
      url: http://localhost:8081
Gateway Config 확인
profile 설정을 native, local로 설정하고( -Dspring.profiles.active=native,local ) Configuration서버를 실행합니다. 아래와 같이 Gateway설정 결과를 확인합니다.
$ curl http://localhost:9000/zuul-gateway/local
{
  "name": "zuul-gateway",
  "profiles": [
    "local"
  ],
  "label": null,
  "version": null,
  "state": null,
  "propertySources": [
    {
      "name": "classpath:/server-configs/zuul-gateway-local.yml",
      "source": {
        "zuul.routes.member.stripPrefix": false,
        "zuul.routes.member.path": "/v1/member/**",
        "zuul.routes.member.url": "http://localhost:8080",
        "zuul.routes.pay.stripPrefix": false,
        "zuul.routes.pay.path": "/v1/pay/**",
        "zuul.routes.pay.url": "http://localhost:8080",
        "zuul.routes.else.stripPrefix": false,
        "zuul.routes.else.path": "/v1/**",
        "zuul.routes.else.url": "http://localhost:8081"
      }
    }
  ]
}
Netflix Zuul Gateway 프로젝트 생성
SpringCloud는 Netflix에서 Opensource로 공개한 Zuul Gateway를 Spring 환경에 통합하여 기능을 제공하고 있습니다. Gateway의 경우 아무래도 클라이언트 접점의 최전선이므로 단일 서비스로 운영하기 보다는 여러대로 구성하고 LoadBalancer로 묶어 HA(High Availability)를 확보하는 것이 좋습니다.
신규 Boot 프로젝트를 하나 생성합니다. 이전장에서 구축했던 member, contents서비스와 Configuration서버의 연동과 설정방법은 거의 비슷합니다. 예제에서는 따로 프로젝트를 생성하지 않고 기존 프로젝트에 multi module로 생성하였습니다.
신규 프로젝트를 초기 구성하는데 어려움이 있다면 Spring initializr를 통해 간편하게 프로젝트를 생성할 수 있습니다. 다음 포스팅을 참고해 주세요.
>> Spring initializr로 Spring 프로젝트 생성하기
build.gradle
spring-cloud-starter-netflix-zuul과 spring-cloud-starter-config를 사용합니다. Configuration서버를 통해 환경설정을 연동하지 않을것이면 netflix-zuul만 사용하면 됩니다.
plugins {
    id 'org.springframework.boot' version '2.1.4.RELEASE'
    id 'java'
}

apply plugin: 'io.spring.dependency-management'

group = 'com.spring'
version = '0.0.1-SNAPSHOT'
sourceCompatibility = '1.8'

repositories {
    mavenCentral()
}

ext {
    set('springCloudVersion', 'Greenwich.SR1')
}

dependencies {
    implementation 'org.springframework.cloud:spring-cloud-starter-netflix-zuul'
    implementation 'org.springframework.cloud:spring-cloud-starter-config'
    compileOnly 'org.projectlombok:lombok'
    annotationProcessor 'org.projectlombok:lombok'
}

dependencyManagement {
    imports {
        mavenBom "org.springframework.cloud:spring-cloud-dependencies:${springCloudVersion}"
    }
}
application.yml
config server를 사용하지 않고 아래처럼 application.yml에 직접 라우팅 할 서버 정보를 나열하여 운영이 가능합니다. 하지만 이렇게 할경우 라우팅 정보가 변경될때마다 Gateway서버를 수정하고 배포해야 하므로 좋은 방법이 아닙니다. 참고만 하고 application파일 대신 bootstrap 파일을 생성하여 configuration server와의 연동을 진행 합니다.
# application.yml - 이 방법을 사용하지 않을것이므로 생성하지 않습니다.
server:
  port: 9100
zuul:
  routes:
    member-service.url: http://localhost:8080
    contents-service.url: http://localhost:8081
bootstrap 설정
application.properties를 삭제하고 bootstrap.yml을 생성합니다.
공통 환경 세팅
application_name과 디폴트 profile, 그리고 환경설정 변경을 위한 endpoint( /actuator/refresh)를 활성화합니다.
# bootstrap.yml
server:
  port: 9100
spring:
  application:
    name: zuul-gateway
  profiles:
    active: local
management:
  endpoints:
    web:
      exposure:
        include: refresh
local 환경 세팅
configuration 서버 접속 정보를 명시합니다.
# bootstrap-local.yml
spring:
  profiles: local
  cloud:
    config:
      uri: http://localhost:9000
      fail-fast: true
alpha 환경 세팅
configuration 서버 접속 정보를 명시합니다.
# bootstrap-alpha.yml
spring:
  profiles: alpha
  cloud:
    config:
      uri: http://localhost:9000
      fail-fast: true
Application 설정
일반적인 Boot설정과 동일합니다. @EnableZuulProxy를 선언하여 Gateway 서버를 활성화 합니다.
@EnableZuulProxy
@SpringBootApplication
public class GatewayApplication {
    public static void main(String[] args) {
        SpringApplication.run(GatewayApplication.class, args);
    }
}
member-service, contents-service Controller 내용 추가
이전장에서 생성한 서비스의 Controller에 내용을 좀더 추가합니다.
// MemberController
@RestController
@RequestMapping("/v1")
@RefreshScope
public class MemberController {

    @Value("${server.port}")
    private int port;

    @Value("${spring.message}")
    private String message;

    @GetMapping("/member/detail")
    public String member() {
        return "Member Detail - Port " + port + " - " + message;
    }

    @GetMapping("/pay/detail")
    public String pay() {
        return "Pay Detail - Port " + port + " - " + message;
    }
}

// ContentsController
@RestController
@RequestMapping("/v1")
@RefreshScope
public class ContentsController {

    @Value("${server.port}")
    private int port;

    @Value("${spring.message}")
    private String message;

    @GetMapping("/member/detail")
    public String member() {
        return "Member Detail - Port " + port + " - " + message;
    }

    @GetMapping("/pay/detail")
    public String pay() {
        return "Pay Detail - Port " + port + " - " + message;
    }

    @GetMapping("/comment")
    public String comment() {
        return "Comment - Port " + port + " - " + message;
    }

    @GetMapping("/board")
    public String userDetail() {
        return "Board - Port " + port + " - " + message;
    }
}
Gateway 테스트
Configuration server(9000), Gateway server(9100), member-service(8080), contents-service(8081)를 차례로 실행합니다. profile은 로컬환경을 기준으로 하고 서버를 실행합니다.

서비스 endpoint인 Gateway를 통해 서비스 주소를 요청 해봅니다. 요청을 Gateway로 하지만 라우팅 정보에 따라 서로 다른 서비스가 호출되어 결과가 출력되는것을 확인할 수 있습니다.
# 8080,8081 양쪽에 존재하나 라우팅된 8080 서버에서 처리합니다.
$ curl "http://localhost:9100/v1/member/detail"
Member Detail - Port 8080 - Hello Spring MemberService Local Env!!!!!!
# 8080,8081 양쪽에 존재하나 라우팅된 8081 서버에서 처리합니다.
$ curl "http://localhost:9100/v1/pay/detail"
Pay Detail - Port 8081 - Hello Spring ContentsService Local Env
# 매칭안되는 path는 모두 8081 서버에서 처리됩니다.
$ curl "http://localhost:9100/v1/comment"
Comment - Port 8081 - Hello Spring ContentsService Local Env
$ curl "http://localhost:9100/v1/board"
Board - Port 8081 - Hello Spring ContentsService Local Env
Gateway 라우팅 실시간 변경 테스트
server-configs 아래의 zuul-gateway-local.yml 파일을 수정합니다. 8081으로 라우팅되던 /v1/pay/** 의 라우팅을 8080서버로 가도록 변경합니다. 그리고 Gateway서버로 /actuator/refresh 를 요청하여 설정 내용을 Gateway서버에 반영 합니다. 다시 url을 요청하면 변경된 8080 서버에서 요청이 처리되는 것을 볼 수 있습니다.
# zuul-gateway-local.yml
zuul:
  routes:
    member:
      stripPrefix: false
      path: /v1/member/**
      url: http://localhost:8080
    pay:
      stripPrefix: false
      path: /v1/pay/**
      url: http://localhost:8080
    else:
      stripPrefix: false
      path: /v1/**
      url: http://localhost:8081
$ curl -XPOST http://localhost:9100/actuator/refresh
["zuul.routes.pay.url"]
$ curl localhost:9100/v1/pay/detail
Pay Detail - Port 8080 - Hello Spring ContentsService Local Env
필터 적용
Gateway에는 필터를 적용할 수 있습니다. 필터는 클라이언트의 HTTP 요청을 받고 응답하는 과정에서 리퀘스트를 라우팅하는 동안 수행할 액션을 지정할 수 있습니다. 종류는 다음과 같이 4가지가 있습니다
PRE
백엔드 서버로 라우팅 되기 전에 수행되는 필터로 요청에 대한 인증, 로깅, 디버깅 등을 처리할 수 있습니다.
ROUTING
요청에 대한 라우팅을 제어할 때 사용되는 필터로 Apache HttpClient 또는 Ribbon을 사용하여 백엔드 서버로 요청을 동적으로 라우팅 할 수 있습니다.
POST
백엔드 서버로 요청이 라우팅되고 난 후에 수행되는 필터로서 응답에 HTTP 헤더를 추가하거나, API 응답속도, 각종 지표나 메트릭을 수집할때 사용할 수 있습니다.
ERROR
위의 단계 중 에러가 발생하면 실행되는 필터입니다.
다음과 같이 테스트를 위한 필터를 작성합니다.
pre filter
@Slf4j
public class GatewayPreFilter extends ZuulFilter {
    @Override
    public String filterType() {
        return FilterConstants.PRE_TYPE;
    }

    @Override
    public int filterOrder() {
        return 0;
    }

    @Override
    public boolean shouldFilter() {
        return true;
    }

    @Override
    public Object run() {
        RequestContext ctx = RequestContext.getCurrentContext();
        HttpServletRequest request = ctx.getRequest();
        log.info("Using Pre Filter : "+request.getMethod() + " request to " + request.getRequestURL().toString());
        return null;
    }
}
route filter
@Slf4j
public class GatewayRouteFilter extends ZuulFilter {
    @Override
    public String filterType() {
        return FilterConstants.ROUTE_TYPE;
    }

    @Override
    public int filterOrder() {
        return 0;
    }

    @Override
    public boolean shouldFilter() {
        return true;
    }

    @Override
    public Object run() {
        log.info("Using Route Filter");
        return null;
    }
}
post filter
@Slf4j
public class GatewayPostFilter extends ZuulFilter {
    @Override
    public String filterType() {
        return FilterConstants.POST_TYPE;
    }

    @Override
    public int filterOrder() {
        return 0;
    }

    @Override
    public boolean shouldFilter() {
        return true;
    }

    @Override
    public Object run() {
        log.info("Using Post Filter");
        return null;
    }
}
error filter
@Slf4j
public class GatewayErrorFilter extends ZuulFilter {
    @Override
    public String filterType() {
        return FilterConstants.ERROR_TYPE;
    }

    @Override
    public int filterOrder() {
        return 0;
    }

    @Override
    public boolean shouldFilter() {
        return true;
    }

    @Override
    public Object run() {
        log.info("Using Error Filter");
        return null;
    }
}
Application에 filter 등록
@EnableZuulProxy
@SpringBootApplication
public class GatewayApplication {
    public static void main(String[] args) {
        SpringApplication.run(GatewayApplication.class, args);
    }

    @Bean
    public GatewayPreFilter preFilter() {
        return new GatewayPreFilter();
    }

    @Bean
    public GatewayPostFilter postFilter() {
        return new GatewayPostFilter();
    }

    @Bean
    public GatewayRouteFilter routeFilter() {
        return new GatewayRouteFilter();
    }

    @Bean
    public GatewayErrorFilter errorFilter() {
        return new GatewayErrorFilter();
    }
}
필터 테스트
Gateway서버를 재실행하고 다음과 같이 실행하면 Gateway Log에서 필터를 거치는것을 확인할 수 있습니다.
$ curl "http://localhost:9100/v1/member/detail
2019-05-17 15:37:21.734  INFO 92558 --- [nio-9100-exec-5] com.spring.msa.filter.GatewayPreFilter   :
Using Pre Filter : GET request to http://localhost:9100/member/detail
2019-05-17 15:37:21.734  INFO 92558 --- [nio-9100-exec-5] c.spring.msa.filter.GatewayRouteFilter   :
Using Route Filter
2019-05-17 15:37:21.773  INFO 92558 --- [nio-9100-exec-5] com.spring.msa.filter.GatewayPostFilter  :
Using Post Filter
필터 예제는 아래 Github에서 더 다양한 내용을 살펴볼 수 있습니다.
실습에서 사용한 소스는 다음 Github에서 확인하실수 있습니다.
https://github.com/codej99/SpringCloudMsa/tree/feature/zuul-gateway


